


6-18 Sample Materials
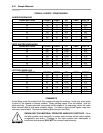
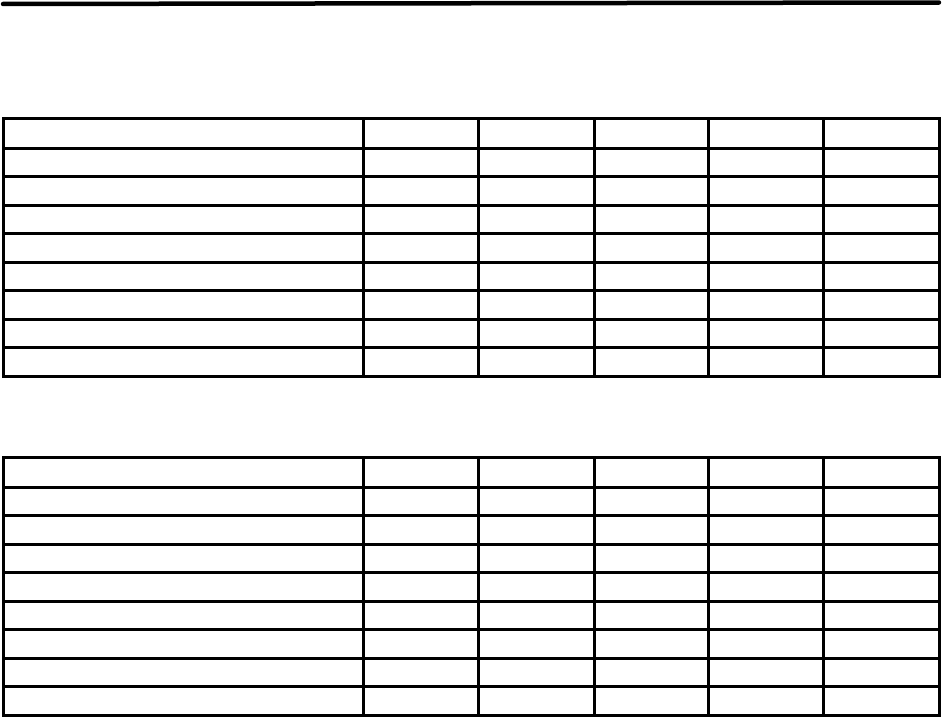
MELAMINE - PHOTO/CLIPART ENGRAVING
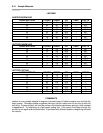
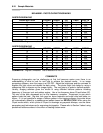
RASTER ENGRAVING
LASER WATTAGE POWER SPEED PPI PASS DEPTH
15 80 30 500 1 .008”
20 80 40 500 1 .008”
25 80 50 500 1 .008”
30 80 60 500 1 .008”
35 80 70 500 1 .008”
40 80 80 500 1 .008”
45 80 90 500 1 .008”
50 80 100 500 1 .008”
COMMENTS: Engrave unmasked. Use a resolution of 500 DPI.
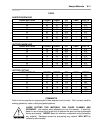
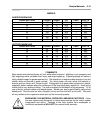
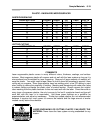
RASTER ENGRAVING
LASER WATTAGE POWER SPEED PPI PASS DEPTH
15 80 15 500 1 .008”
20 80 20 500 1 .008”
25 80 25 500 1 .008”
30 80 30 500 1 .008”
35 80 35 500 1 .008”
40 80 40 500 1 .008”
45 80 45 500 1 .008”
50 80 50 500 1 .008”
COMMENTS: Engrave unmasked. Use a resolution of 250 DPI.
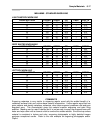
COMMENTS
Engraving photographs can be challenging at first but becomes easier once there is an
understanding of what to look for and how to achieve the desired results. In an image
processing software, scan the image in at 300 DPI. Adjust the brightness and the contrasts to
brighten the light colors and darken the dark colors. The photo might look better by using a
sharpening filter to sharpen up the image slightly. The next step is to select a halftone pattern.
Usually, imaging software gives the choice of using different halftone patterns including
frequency of lines per inch and pattern angles. Use a line frequency above 20 and below 100.
The size of the dots decreases as the line frequency increases. Experiment to see which
pattern looks the best. Big dots look good on some materials and small dots look better on
others. If it is not possible to assign a halftone pattern in the imaging software, the printer driver
will automatically default to a predetermined pattern based on RESOLUTION. When using the
Clipart mode switch, which prints all Clipart or drawings as grayscale bitmaps, use the same
parameters and techniques as for engraving photographs. Please refer to Section 3 about using
predefined halftone screens in the driver or creating custom ones.