


TROUBLESHOOTING & REPAIR
F-56 F-56
POWER MIG 300
Return to Section TOC Return to Section TOC Return to Section TOC Return to Section TOC
Return to Master TOC Return to Master TOC Return to Master TOC Return to Master TOC
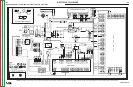
VOLTAGE & CURRENT CALIBRATION PROCEDURE (continued)
9. Wait for the machine’s output to be automati-
cally turned off and then back on.
10. Adjust the output control knob again if neces-
sary to make the actual voltage output 20
volts +/- .5 volts.
11. Wait for the machine’s output to be automati-
cally turned off and then back on.
12. Repeat the above two steps if necessary.
13. Toggle the mode select switch up and release
the switch to save the calibration setting.
14. The right display will display the message
“VcAL SAVEd”. Within 5 seconds, hold the
mode set switch in the up position until the
right display stops blinking.
15. The machine will reset to normal operation
after a few seconds.
NOTE: If the mode select switch is not toggled
within 30 seconds after adjusting the out-
put control knob, the machine will leave
the calibration mode and use the previ-
ous calibration settings.
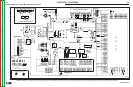
CURRENT CALIBRATION
PROCEDURE
1. Connect the resistive load bank of approx.
.106 ohms and test ammeter to the welding
output terminals.
2. Toggle and hold the mode select button in the
up position.
3. Turn on the Power Mig 300.
4. Once the display reads “Pres Spin” release
the mode select switch. Rotate the output
knob until the display reads “cur cAL”.
5. Toggle the Mode Select switch once.
6. The left display will change to “lcAL” to indi-
cate that current calibration is in progress.
7. The right hand display will scroll the following
message: Adj rEnc SorEAL cur = 250A.
8. Adjust the right hand output control knob until
the actual output current reading on the test
ammeter is 250 amps +/- 2A.
9. Wait for the machine’s output to be automati-
cally turned off and then back on.
10. Adjust the output control knob again if neces-
sary to make the actual output current read-
ing on the test ammeter 250 amps +/- 2A.
11. Wait for the machine’s output to be automati-
cally turned off and then back on.
12. Repeat the above two steps if necessary.
13. Toggle the mode select switch up and release
the switch to save the calibration setting.
14. The right display will display the message
“lcAL SAVEd”. Within 5 seconds, hold the
mode set switch in the up position until the
right display stops blinking.
15. The machine will reset to normal operation
after a few seconds.
NOTE: If the mode select switch is not toggled
within 30 seconds after adjusting the out-
put control knob, the machine will leave
the calibration mode and use the previ-
ous calibration settings.