


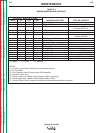

CHANGE THE OIL FILTER: Change the oil filter the
first time between 25 and 50 hours of operation. Then,
under normal operating conditions, change the oil filter
per Table D.1 or consult your engine Owner’s Manual.
If the engine is operated under heavy load or in high
ambient temperatures, change the oil filter more fre-
quently. See Table D.1 for recommended maintenance
intervals. Order Fram oil filter #PH-8A or Purolator
#PER-1A from your local engine service center.
Change the oil filter as follows:
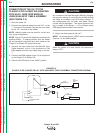
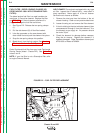
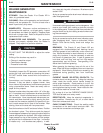
1. See Figure D.1. Remove the oil drain plug (1).
Drain the oil from the engine and allow the oil filter
to drain.
2. See Figure D.1. Remove the old filter (spin it off)
and discard it (2). Wipe off the filter mounting sur-
face and adapter.
3. Fill the new filter with fresh engine oil. Apply a thin
coat of new oil to the rubber gasket on the new oil
filter.
4. Spin the new filter onto the mounting adapter finger
tight until the gasket is evenly seated. Then turn it
down another 1/2 turn. Do not overtighten the new
filter.
5. Refill the engine with the proper amount and type
of oil as described in the
Change the Oil
section,
above. Start the engine and check for leaks around
the filter element. Correct any leaks (usually by
retightening the filter, but only enough to stop
leaks) before placing the Classic III or Classic IIID
back in service.
6. See Figure D.1. If there are no leaks, stop the
engine and recheck the oil level. If necessary, add
oil to bring the level up to the “MAX” mark, but do
not overfill.
FUEL: At the end of each day's use, refill
the fuel tank to minimize moisture conden-
sation and dirt contamination in the fuel line.
Do not overfill; leave room for the fuel to
expand.
Refer to your engine Owner’s Manual for recom-
mended grade of fuel.
MAINTENANCE
D-3 D-3
Classic III and IIID
Return to Section TOC Return to Section TOC Return to Section TOC Return to Section TOC
Return to Master TOC Return to Master TOC Return to Master TOC Return to Master TOC
{
4
2
1
3
MAX
MIN
5
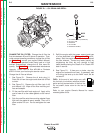
FIGURE D.1 – OIL DRAIN AND REFILL
1. OIL DRAIN PLUG (LOCATION)
2. OIL FILL CAP
3. DIPSTICK
4. OIL FILTER
5. DIPSTICK LEVELS