


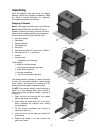


16
Maintenance
Note: See also Maintenance Checklist on
page 19.
For best results, perform the following proced-
ures on a routine basis:
Grease the four leadscrews on the table.
Lubricate the bushings at each end of the
pressure rollers. Use a dry type lubricant for
this, such as graphite or silicone that will not
attract dust.
Keep the chain below the table clean and
oiled.
Clean sawdust from the abrasive strips with
a soft brush or cleaning stick.
Blow dust from motors and switches.
Check screws, nuts, etc. for tightness.
Check the tension and condition of the belts;
dress with paraffin. (Do not get paraffin on
the abrasive belts.)
Check the oil level in the gearbox by
removing the oil plug on top, and inserting a
depth gauge (not included). Generally, the
oil should be about 3-1/2” lower than the top
surface of the gearbox. If low, fill as
necessary with EP2 oil.
NOTE: If using oil from a new source (i.e.
different brand), it is advisable to flush and
clean the gearbox before filling to avoid
potential incompatibility issues.
Every 2,500 hours, completely drain and
refill gearbox with EP2 oil.
Operations
Basic Operation
The basic operating procedure for the Dual
Drum Sander is as follows:
1. Set depth of cut.
2. Start drums.
3. Start conveyor and select feed rate.
4. Start dust collector system.
5. Feed stock through unit.
Determining depth of cut is one of the most
important procedures for the sander. It may take
some experimentation to determine the proper
depth of cut, given the variables of abrasive grit,
type of wood, and feed rate. For best results,
use scrap wood to practice sanding and to
develop skill and familiarity with the machine
before doing finish work.
A good rule of thumb when sanding with grits
finer than 80 is to lower the drum so it contacts
the workpiece but drum can still be rotated by
hand. When using grits coarser than 80 grit, you
can lower the drum slightly more. However, a
combination of several variables will determine
the proper depth of cut to use, including the
following:
Abrasive type and grit size.
Width of the piece being processed.
Hardness of the piece.
Feed rate of the conveyor belt.
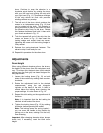
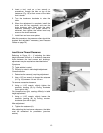
Stock Feeding Angle
Some pieces, because of their dimensions, will
need to be fed into the machine at a 90º angle
(perpendicular to the drums). However, even a
slight offset angle of the stock will provide for
more effective stock removal. The optimum
feeding angle is about 60º (Fig. 24). Angling the
workpiece for stock removal provides other
advantages, such as less loading of certain
areas of the drums due to glue lines or mineral
streaks in the stock, more even wear of abrasive
strips, potentially faster feed rates, and lighter
loads on the motor.
Note, however, that to get the best final finish
the stock should be fed through the machine so
it will be sanded in line with the grain of the
wood on the final one or two passes.
Multiple-Piece Sanding Runs
When abrasive planing (or thickness sanding) a
run of similar pieces that you want to have the
same thickness, it is best to determine the
thickness of the thinnest piece and process all
pieces to that same thickness in one session. Be
aware that the sander will remove cups and
crowns in the workpiece; consider this when
measuring and processing stock to the same
thickness.
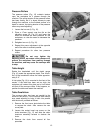
When sanding multiple pieces simultaneously,
make sure to stagger (step) the pieces across
the width of the conveyor belt. This provides
better contact with the pressure rollers. Try to
only process multiple pieces of similar thickness.
If there is a significant thickness difference, the
thinner pieces may slip on the conveyor belt if
they do not contact the pressure rollers.