


9
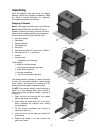
Exposed metal surfaces, such as the shafts on the
drums and pressure rollers, have been given a
protective coating at the factory. This should be
removed with a soft cloth moistened with kerosene.
Do not use acetone, gasoline, or lacquer thinner
for this purpose. Do not use solvents on plastic
parts, and do not use an abrasive pad because it
may scratch the surfaces.
Assembly
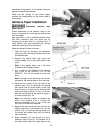
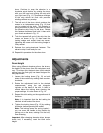
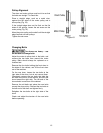
Handwheel Assembly
1. Slide the post up into the handwheel and
secure with the set screws, as shown in Fig 6.
2. Use a flat head screwdriver to screw the bolt of
the handle as far as it will go into the threaded
hole of the handwheel, then tighten the hex nut
down against the handwheel (Fig. 6).
The handle must rotate freely after tightening
the hex nut. If the handle is too tight, loosen
the hex nut and back out the bolt slightly, then
re-tighten the hex nut.
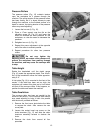
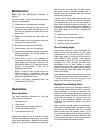
3. The handwheel assembly, used for raising and
lowering the conveyor table, is designed to be
mounted and removed quickly. Set the
handwheel assembly down into the hole of the
hood (Fig. 7) and rotate it until it seats itself
upon the pins of the leadscrew below.
Note: The handwheel must be removed before the
hood can be opened.
Dust Ports
Mount the two dust ports to the top of the hood
with eight 3/16 x 1/2 screws and eight flat washers
(Fig. 7).
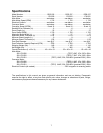
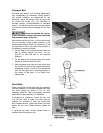
Dust Collection
It is strongly recommended that you connect a
proper dust extraction system to the two 4” ports
atop the sander. Make sure the capacity of your
dust collector is at least 1200 CFM. See Figure 2
for a diagram of the dust port spacing.
Electrical Connections
Electrical connections must be
made by a qualified electrician in compliance
with all relevant codes. The machine must be
properly grounded to help prevent electrical
shock and possible fatal injury.
The installer must follow local regulations and
National Electrical Code, ANSI/NFPA 70
installation requirements.
This tool should be connected to a grounded metal
Figure 6
Figure 7