


20
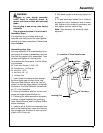
Yoke Clamp Adjustment
To check the yoke clamp adjustment follow
these steps:
1. Pull the yoke lock handle towards the
front of saw to unlock yoke. Pull forward on
theyokeindexlever(ontheleftsideofcar-
riage) to disengage index pin.
2. Swivel the motor halfway between the
crosscutting and rip position so the index pin
is not engaged.
3. Lock the yoke lock handle.
4. Grasp the motor with both hands and try
to swivel it back into the crosscut position. It
should not move.
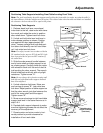
5. If it does move follow these steps:
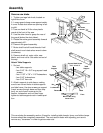
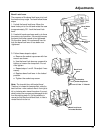
a. Remove arm cap.
b. Remove carriage stop screw and lock-
washer with a 1/4 inch hex-L wrench.
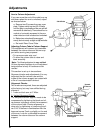
c. Grasp the carriage assembly, move it
carefully off the end of radial arm, holding
it parallel to the radial arm until all car-
riage bearings are free of their tracks.
d. Rest the motor and carriage assembly
on saw frame.
e. Set yoke lock handle at unlocked posi-
tion. Tighten nut with 15/16" wrench, until
lock handle locks mid-way between the
two legs of the yoke.
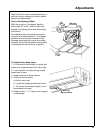
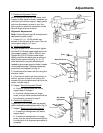
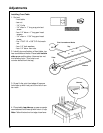
f. Hold the motor and carriage assembly
parallel to radial arm and start the rear
bearings onto the tracks. Continue to hold
the assembly parallel to the tracks until
the forward bearings are on the tracks.
g. Slide the carriage rearward on the
radial arm and install the carriage stop
screw and lockwasher.
h. Repeat steps 1-4. Readjust if neces-
sary.
i. Install arm cap.
WARNING
Reinstall carriage stop screw and lock-
washer to prevent carriage from rolling
off arm.
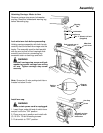
Yoke Lock
Handle
Lockwasher
Arm Cap
Screw
Carriage Stop
Screw
Hex “L” Wrench
(1/4-Inch)
15/16" Wrench
Adjustments