


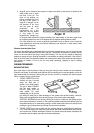

to be welded. Only after you are satisfied that your practice welds are of good strength and
appearance, should you attempt your actual welding job.
CONTROLS & THEIR FUNCTIONS
ON-OFF – THERMAL INDICATOR
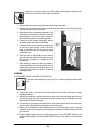
To turn the power on to the welder, push the main switch to ON. Your welder has a lighted main
switch. This light will come on if the welder has overheated. The light indicates that a thermostat has
shut off the power within the welder. Once the welder has cooled, the thermostat will turn the welder
back on and the light will go out. Over heating is usually caused by exceeding the welder duty cycle.
Note that whenever the switch is set to ON, the welding wire installed in the welder is electrically
active. Make sure the wire is not in contact with the ground clamp or a metal surface connected to the
ground clamp.
VOLTAGE SELECTOR
Two heat settings can be selected. The lower setting is for thinner material, the higher setting for
thicker materials.
WIRE SPEED
The wire speed control adjusts the speed at which the wire is fed out of the gun. The wire speed
needs to be matched, or “tuned-in”, to the rate at which it is being melted off. Some things that affect
wire speed selection are the type and diameter of the wire to be used, the desired heat setting, and
the welding position to be used.
DUTY CYCLE
The duty cycle rating of a welder is a measure of how long the welder can weld and how long it must
be rested to cool. It is expressed as a percentage of ten minutes (the industry recognized cycle time)
and represents the maximum welding time allowed, with the balance of the ten minute cycle required
for cooling.
INTERNAL THERMAL PROTECTION
If you exceed the duty cycle of your welder, an internal thermal protector will open and shut off all
welder functions except the cooling fan. If this ever happens to you, do not shut off the welder! Leave it
turned on with the fan running. After cooling a while, the thermal protector will automatically reset and
the welder will function again. However, you should wait at least 10 minutes after the thermal protector
opens before resuming welding, even if the protector resets itself sooner, or you may experience less
than specified duty cycle performance.
If you find that your welder will not weld for 1 minute without stopping, reduce the wire speed slightly
and tune the welder in at the lowest wire setting that still produces a smooth arc. Welding with the wire
speed too high causes excessive current draw and shortens the unit duty cycle.
CAUTION!
DO NOT CONSTANTLY EXCEED THE DUTY CYCLE OR DAMAGE TO THIS WELDER WILL
RESULT!
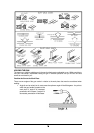
TUNING IN THE WIRE SPEED
This is one of the most important parts of MIG welder operation and must be done before starting
each welding job, or whenever any of the following variables are changed: heat setting, wire diameter,
or wire type.
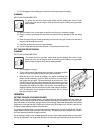
1. Set up and ground a scrap piece of the same type of metal that you will be welding. It should
be equal to or greater than the thickness of the actual work piece and free of paint, oil, rust,
etc.
2. Select a VOLTAGE setting.
3. Hold the gun in one hand allowing the nozzle to rest on the edge of the work piece farthest
away from you and at an angle similar to that which will be used when actually welding.
4. With your free hand, turn the WIRE SPEED control to maximum and continue to hold onto
the knob.
11