


19
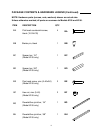
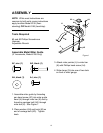
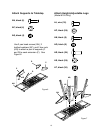
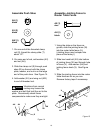
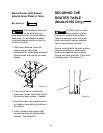
Assemble Push Shoe
AU (1)
black
AV (2)
black
AW (1)
black
1. On one end of the threaded clamp
rod (S), thread the clamp plate (T)
about 1/2".
2. On same end of rod, add washer (AV)
and nut (AU).
3. Slide the clamp rod (S) through push
shoe (R) so the end with the clamp
plate, washer, and nut is on the large
end of the push shoe. See Figure 14.
4. Add washer (AV) and wing nut (AW)
to end of threaded rod.
Vibrations from normal
routing may loosen the
washer and bolt that hold the rod to the
plate. Occasionally check these
components to make sure they are tight.
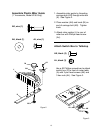
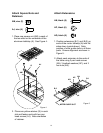
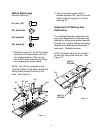
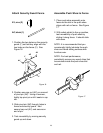
Assemble Jointing Fence to
Router Table Fence
AX (1)
zinc
AH (1)
black
1. Using the slots on the fence as
guides, slide the jointing fence (W)
into the router table fence (V).
(Jointing fence may be taped into
place at the factory.)
2. Slide hex head bolt (AX) into bottom
of jointing fence (W) and through hole
in fence (V). Add washer (AH) and
jointing fence knob (X). See Figure
15.
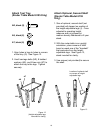
3. Slide the jointing fence into the router
table fence as far as you can.
Remove factory tape if necesssary.
WARNING
W
AX
AH
X
V
T
AV
S
R
AW
AV
AU
Figure 14
Figure 15