


36
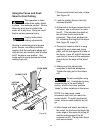
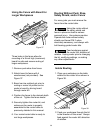
Using the Fence with Board for
Larger Workpieces
P
U
L
L
O
N
P
U
S
H
O
F
F
R
E
S
E
T
O
U
T
L
E
T
S
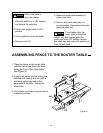
Three holes in the fence allow for
mounting of a 8-inch high (maximum)
board for safe and secure routing of
larger workpieces.
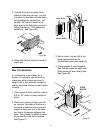
1. Remove push shoe from fence.
2. Attach board to fence with 4
woodscrews (not provided). See
Figure 37.
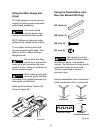
3. Board can be notched out prior to
routing or router bit profile can be
made in board by driving board
through router bit.
4. Position the fence to the desired depth
of the cut. Tighten the fence knobs.
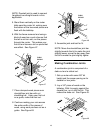
5. Securely tighten the router bit, and
make sure the router is properly
assembled to the router table as
previously detailed in this manual.
6. Your router/router table is ready to
rout large workpieces.
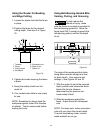
Routing Without Push Shoe,
Safety Shield, and/or Fence
For many jobs you must remove the
fence from the router table.
Using the router without
the safety shield and
fence in place can lead to serious
personal injury. Use extreme caution.
Operate the router without safety
shields and fence ONLY when
absolutely necessary, and always with
ball-bearing-guided router bits.
Feed workpiece against
the router bit's direction of
rotation. Unplug router prior to changing
the bit, modifying settings, or making
any other adjustments.
WARNING
WARNING
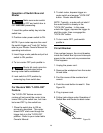
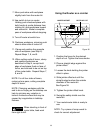
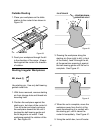
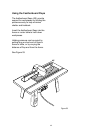
Inside Routing
1. Place your workpiece on the table
relative to the router bit as shown in
Figure 38.
2. Feed your workpiece through the bit
in the direction of the arrow. Always
feed against the router bit's direction
of rotation.
Figure 38
Figure 37
P
U
L
L
O
N
P
U
S
H
O
F
F
R
E
S
E
T
O
U
T
L
E
T
S
W
A
R
N
I
N
G
NG