


25
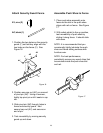
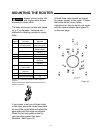
8. Using a pen or pencil, mark the
positions of the mounting holes in the
base plate on the paper template.
9. Take the base plate off the square
adaptor base plate and put it aside.
10. Using a drill bit that matches the
diameter of the holes in the router
base plate, bore into the square
adaptor base plate in the locations
previously marked. (To reduce drill
breakout, use a back-up board.)
11. Remove the paper template from the
square adaptor base plate.
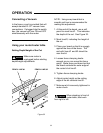
12. Flip the square adaptor base plate
over. With the welded nuts now
facing downward, position the adaptor
plate on the router. (The welded nuts
and the router must be on the same
side of the adapter plate.) See Figure
22.
13. With the square adaptor base plate
holes and router holes aligned, insert
appropriate screws and tighten.
Make sure the screws
from your router base plate
are long enough to mount the square
adaptor base plate securely. If
necessary, replace with screws that are
1/8" to 1/4" longer.
Figure 22
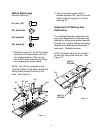
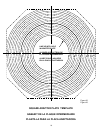
WARNING
Make sure edges of
template align with edges
of square adaptor base plate, and inner
circle accurately lines up with hole in
plate. Routing accuracy will suffer if
alignments are not true.
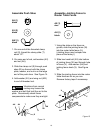
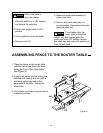
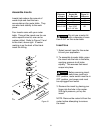
4. Use tape to attach template to the
square adaptor base plate (Z).
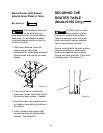
5. Lay the square adaptor base plate on
a flat surface with template and
weldnuts facing up.
6. Unscrew the fasteners that hold the
router base plate to the router and set
them aside.
7. Turn the router base plate over and
position it face down on the template,
which is still taped to the square
adaptor base plate. The position of
the base plate must line up with one
of the circles on the template. See
Figure 21.
CAUTION
SQUARE
ADAPTOR
BASE
PLATE (Z)
WELDNUT
TEMPLATE
ROUTER
BASE PLATE
Figure 21
WELDNUT