


Bridge Status 3-7
NB-30 Bridging
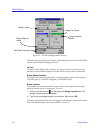
¥ NO EXT CLOCK (blue) Ñ Indicates that the remote port is not receiving a
clock signal from the DCE.
Interface Name
This settable information Þeld allows you to enter a name for the bridgeÕs active
local port and its remote port. The default name for the bridgeÕs two network
interfaces are ETHERNET PORT and REMOTE PORT, respectively. To assign a
new name to an interface:
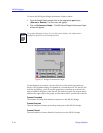
1. Click on the I-bar cursor ( ) to the right of the Interface Name field. The
Bridge Port Name text box will appear.
2. Type in the new interface name in the text box (up to 14 characters), then click
on OK.
The assigned name will appear in the Bridge Interface Name information Þeld.
Interface Type
Indicates the interface type which applies to each NB-30 bridging port interface.
Possible types are 802.3 SPI (SPIM) for the local Ethernet port and RS449 (Remote
Interface Card supporting RS449/422 communications),V.35 (Remote Interface
Card supporting V.35 communications), DSX1/D4 (superframe format for T1
link), DSX1/ESF (extended superframe format for T1 link).
Bridge Port Address — Local Ethernet Port
Indicates the physical address of the local Ethernet port on the NB-30. No
physical address is available for the remote port.
Segment Name
This settable information Þeld allows you to enter a name for each segment
attached to the bridgeÕs ports. The default name for the bridgeÕs two network
segments are LAN_1 and REMOTE LINK, respectively. To assign a new name to
the network segment connected to a port:
1. Click on the I-bar cursor ( ) to the right of the Segment Name field. The
Bridge Network Name text box will appear.
2. Type in the new segment name in the text box, then click on OK.
The newly assigned name will appear in the Bridge Segment Name information
Þeld.
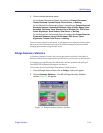
Date and Time
At the bottom of the Bridge Status window, Þelds display the current date and
time set at the NB-30Õs internal clock. You can change the date and time by using
the and symbols respectively. Clicking on these symbols will invoke
Date and Time pop-up windows which you can use to set the internal clock (as
described in the previous chapter).