


Vigor2900 Series User’s Guide
54
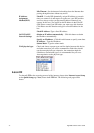
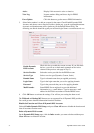
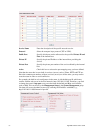
Active Display if this account is active or inactive.
View Log It opens another dialog and shows log for DDNS
information.
Force Update Click this button to get the newest DDNS information.
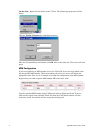
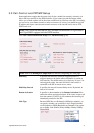
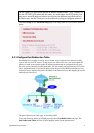
3. Select Index number 1 to add an account for the router. Check Enable Dynamic DNS
Account, and choose correct Service Provider: dyndns.org, type the registered hostname:
hostname and domain name suffix: dyndns.org in the Domain Name block. The
following two blocks should be typed your account Login Name: test and Password: test.
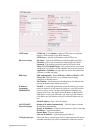
Enable Dynamic
DNS Account
Check this box to enable the current account. If you did check
the box, you will see a check mark appeared on the Active
column of the previous web page in step 2).
Service Provider Select the service provider for the DDNS account.
Service Type Select a service type (Dynamic, Custom, Static).
Domain Name Type in a domain name that you applied previously.
Login Name Type in the login name that you set for applying domain.
Password Type in the password that you set for applying domain.
Mail Extender Some DDNS Server might ask to provide additional
information, e.g., e-mail address. Type in necessary e-mail
address in this field in accordance with the DDNS server.
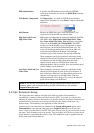
4. Click OK button to activate the settings. You will see your setting has been saved.
The Wildcard and Backup MX features are not supported for all Dynamic DNS providers.
You could get more detailed information from their websites.
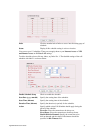
Disable the Function and Clear all Dynamic DNS Accounts
Uncheck Enable Dynamic DNS Setup, and press Clear All button to disable the function and
clear all accounts from the router.
Delete a Dynamic DNS Account
On the Dynamic DNS Setup page, click the Index number you want to delete and then press
Clear All button to delete the account.