


-46-
G0646/G0647 50/65 Ton Ironworker
6. Have an assistant hold the dies as you remove
the flat head cap screws, then remove both
dies from the machine.
Note: To aid in re-installation, record the ori-
entation of each die as your remove it.
7. Thoroughly clean the dies and mounting area
with a solvent or mineral spirits to remove
debris, mill flash, and built-up grime.
Note: If you will be storing the dies, protect
them with a light coat of an anti-rust prod
-
uct like G96® Gun Treatment, SLIPIT®, or
Boeshiel
d® T-9 (see Section 5: Accessories
on Page 35
for more details).
8. Make sure the beam is in proper alignment
with the panels (
Page 42).
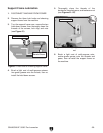
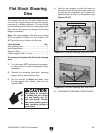
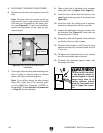
9. Back the bottom die adjustment screws (see
Figure 59) out until they no longer protrude
from the inside face of the front panel.
10. Wipe a light coat of lubricant on all surfaces
of the dies (refer to
Figure 18 on Page 22).
11. Install the bottom die and fully tighten the flat
head cap screws to secure the die tight to the
front panel.
12. Install the top die and fully tighten the cap
screws to secure it in place.
13. Reconnect the machine to power, and turn it
ON.
14. Set the controls to Notch and Inch, bring the
top die down and behind the bottom die.
15. Turn the motor OFF, and press the emer-
gency stop button to avoid unexpected move
-
ment of the tooling.
16. Loosen the bottom die cap screws 2–3
turns.
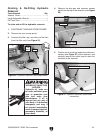
17. Use the feeler gauge and adjust the bottom
die set screws until the clearance between
the top and bottom dies is 0.004" (0.1mm)
along their full length.
18. When you are satisfied with the clearance
adjustment, fully tighten the bottom die cap
screws, and re-check the clearances.
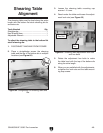
19. Re-install the shearing table and check its
alignment with the bottom die (
Page 49).
20. Re-install the shearing support frame and
shearing hold-down.
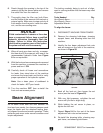
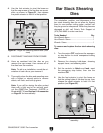
Each of the dies at the angle iron shearing station
have four different mounting positions to use a
different set of cutting edges.
Because of the critical positioning in relation to
each other, these dies cannot be sharpened.
When they become damaged or dull, call Grizzly
Tech Support at (570) 546-9663 to order new
ones.
To re-install the angle iron shearing dies, use the
same tools, clearance specification, and proce
-
dures used in re-installing the flat stock shearing
dies (refer to Page 45).
Tools Needed Qty
Hex Wrench 8mm .............................................. 1
Hex Wrench 10mm ............................................
1
To remove the angle iron shearing dies:
1. Turn the motor OFF, and press the emergen-
cy stop button to avoid unexpected tooling
movement.
2. Remove the shearing hold-down, shearing
support frame, and shearing table.
3. Set the controls to Notch and Inch, reset
the emergency stop button, then turn the
machine ON.
Angle Iron Shearing
Dies