


53
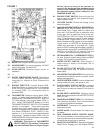
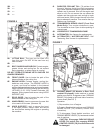
• Start the engine using the ENGINE START SWITCH
(1H). Follow the procedure in the engine manual. In
Cold conditions, pre-heat the engine by holding in the
ENGINE START SWITCH (1H) for 15 seconds.
• Let the engine warm up for several minutes with ENGINE
THROTTLE (1F) at the low speed setting.
• When ready, open the WATER VALVE (1T).
• Set WATER SAFETY SWITCH (1L) to “1” (ON).
Test for adequate water supply. (2.5 - 5.0
GPM) (10 - 20 Liters per Minute) Low water
ow will cause damage to diamond blades.
• For Machines without the Optional BLADE CLUTCH
SWITCH (1V): Pull ENGINE THROTTLE (1F) out to
set engine RPM at 3200, as shown on the ENGINE
TACHOMETER (1G).
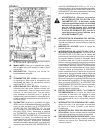
See chart for the appropriate blade shaft and engine
speeds for specifc blade sizes.
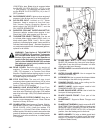
• Move the saw forward or reverse (Standard and Front
Pivot Models) slowly by pushing or pulling on the Speed
Control Lever (1O). Move the saw slowly to prevent
stalling the blade. Make sure the Front Guide (6D),
Rear Guide (6F) and DIAMOND BLADE (2E) stay on
the line.
Rear Pivot Model Only: For the Rear Pivot Model, aligning
to the cutting line can be made using the pivot feature on
the machine. Simply move the DIFFERENTIAL SWITCH
(1J) to the Left position (Pivot), and then use both hands to
push down on the HANDLEBARS (6G), and the machine
can be pivoted from side to side to align with the cutting
line. After the saw is properly aligned to the cutting line,
toggle the DIFFERENTIAL SWITCH (1J) to the Center
(Lock) position.
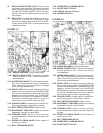
• Set the BLADE CLUTCH SWITCH (1V) (if equipped) to
“1” (ON) to engage the Blade Drive when engine is at
IDLE SPEED (1200 RPM or less)! When clutch engages
and blade is at idle speed, pull out ENGINE THROTTLE
(1F) and set engine RPM at 3200.
• Lower the saw by pressing the TOGGLE SWITCH (1P)
on the SPEED CONTROL LEVER (1O) downward until
the DIAMOND BLADE (2E) is at the desired cutting
depth (See “Blade Cutting Depth Information”).
Be certain that water ow is abundant for
wet sawing.
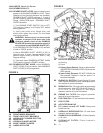
Blade Cutting Depth Information:
The saw is equipped with a BLADE DEPTH INDICATOR
(1Q) which has two number ranges. The Orange and White
number ranges are used for two different purposes:
1) The “Depth” number range, indicated by the Orange
color, shows the current Cutting Depth of the DIAMOND
BLADE (2E). As the saw is lowered, the BLADE
DEPTH INDICATOR (1Q) needle travels through these
numbers in increasing order. Or
2) The “SMD” or “Set Maximum Depth” number range,
indicated by the White color, is the uncut depth of the
DIAMOND BLADE (2E). The desired maximum cutting
depth is pre-set using the BLADE DEPTH INDICATOR
(1Q). It can be used with or without the BLADE DEPTH
STOP SWITCH (1M) feature. As the saw is lowered,
the BLADE DEPTH INDICATOR (1Q) needle travels
through the White color number range in decreasing
order, indicating the unnished depth of cut. When
the BLADE DEPTH INDICATOR (1Q) needle reaches
“0” position, the desired maximum cutting depth is
reached. If the BLADE DEPTH STOP SWITCH (1M)
feature is used (“1” or “ON” position), the lowering
process stops automatically.
Using the BLADE DEPTH INDICATOR (1Q):
“Depth” Mode (Orange colored numbers show current
cutting depth):
• Turn ENGINE START SWITCH (1H) to “0” (OFF)
position to STOP engine (If running).
• Turn ENGINE START SWITCH (1H) to “1” (RUN)
position to power electrical system.
• Turn BLADE DEPTH STOP SWITCH (1M) to “0”
(OFF) position.
• Lower DIAMOND BLADE (2E) by pushing the TOGGLE
SWITCH (1P) on the SPEED CONTROL LEVER (1O)
downward until the DIAMOND BLADE (2E) touches the
surface to be cut.
• Rotate the BLADE DEPTH INDICATOR (1Q) needle to
align to the “0” depth.
• As DIAMOND BLADE (2E) is lowered into the cutting
surface, the current cutting depth will now be indicated
by the Orange text number range on BLADE DEPTH
INDICATOR (1Q) needle.
SMD or “Set Maximum Depth” Mode without
BLADE DEPTH STOP (White colored numbers show
uncut depth):
• Turn ENGINE START SWITCH (1H) to “0” (OFF)
position to STOP engine (If running).
• Turn ENGINE START SWITCH (1H) to “1” (RUN)
position to power electrical system.
• Lower DIAMOND BLADE (2E) by pushing TOGGLE
SWITCH (1P) on the SPEED CONTROL LEVER (1O)
downward until DIAMOND BLADE (2E) touches the
surface to be cut.
• Rotate the BLADE DEPTH INDICATOR (1Q) needle to
align with the desired maximum cutting depth on White
colored number range. The uncut depth will now be
indicated on the White colored number range. When
the BLADE DEPTH INDICATOR (1Q) needle gets to the
“0” position, the saw is cutting at the desired maximum
cutting depth.
• Raise the blade by pushing the TOGGLE SWITCH (1P)
on the SPEED CONTROL LEVER (1O) upward until the
DIAMOND BLADE (2E) is off of the cutting surface.
• Turn the ENGINE START SWITCH (1H) to the “0” (OFF)
position to turn off power to electrical system.