


54
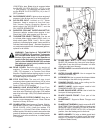
7 Stopping The Saw
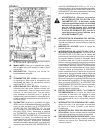
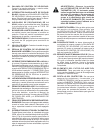
(See Figures 1-2)
For EMERGENCY STOP, press down on the
RED PALM SWITCH (1K) on the cowl. This
will stop the engine and disconnect power
to all electrical items except lights. Reset the
RED PALM SWITCH (1K) by pulling out until
it pops up, then restart engine.
• Move the SPEED CONTROL LEVER (1O) to the STOP
POSITION (1BB).
• Raise the DIAMOND BLADE (2E) out of the cut by
pressing the TOGGLE SWITCH (1P) on the SPEED
CONTROL LEVER (1O) upward until the DIAMOND
BLADE (2E) clears the surface.
• Disengage the BLADE CLUTCH SWITCH (1V)
(if equipped).
• Turn the ENGINE THROTTLE (1F) to the LOW
IDLE position.
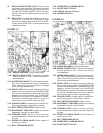
SMD or “Set Maximum Depth” Mode using BLADE
DEPTH STOP SWITCH (1M) (White colored numbers
show uncut depth):
• Turn ENGINE START SWITCH (1H) to “0” (OFF)
position to STOP engine (If running).
• Set the BLADE DEPTH STOP SWITCH (1M) to
the “0” (OFF) position to override the depth stop
setting. Saw will raise and lower over its full range
without stopping.
• Turn ENGINE START SWITCH (1H) to “1” (RUN)
position to power electrical system.
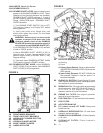
• Lower DIAMOND BLADE (2E) by pushing TOGGLE
SWITCH (1P) on the SPEED CONTROL LEVER (1O)
downward until DIAMOND BLADE (2E) touches the
surface to be cut.
• Rotate the BLADE DEPTH INDICATOR (1Q) needle to
align with the desired maximum cutting depth on White
colored number range.
• Set the BLADE DEPTH STOP SWITCH (1M) to “1”
(ON) position.
• Raise the blade by pushing the TOGGLE SWITCH (1P)
on the SPEED CONTROL LEVER (1O) upward until the
DIAMOND BLADE (2E) is off of the cutting surface.
• Turn the ENGINE START SWITCH (1H) to the “0” (OFF)
position to turn off power to electrical system.
• Now the maximum cutting depth is set. If the saw is
raised out of the cut surface for any reason it can now
be lowered to “Set Max. Depth” by lowering the blade
until the saw lowering movement stops.
The saw WILL NOT lower to any depth
greater than the position set on the BLADE
DEPTH STOP SWITCH (1Q). If a deeper cut is
required, the BLADE DEPTH INDICATOR (1Q)
MUST be turned to the new depth position.
Or push the BLADE DEPTH STOP SWITCH
(1M) to “0” (OFF) position to override the
Depth Stop Feature.
• Turn off the WATER VALVE (1T).
• Let the Engine run at idle for a few minutes before
shutting off.
• STOP the engine by turning the ENGINE START
SWITCH (1H) to the “0” (OFF) position.
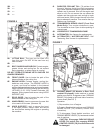
8 Incidents During Sawing
(See Figures 1-2)
If ENGINE STOPS during sawing, check the following:
• Engine out of fuel — Check Fuel Level at FUEL TANK
FILL (5E) or at fuel level gauge at rear of machine.
• Lack of water signals the WATER SAFETY SWITCH
(1L) to stop the engine. Set WATER SAFETY SWITCH
(1L) to “0” (OFF) and then restart the engine.
• Excessively fast cutting speed will stall engine.
• RED PALM SWITCH (1K) has been pressed down.
Reset by pulling switch until it pops upward.
• CIRCUIT BREAKER (1Z) is tripped. Push to Reset
If the DIAMOND BLADE (2E) STOPS during
sawing, check:
• Drive belt tension is inadequate.
• The BLADE CLUTCH SWITCH (1V) has been pushed
to “0” OFF
• The BLADE CLUTCH (1V) (if equipped) has an electrical
failure or blown fuse.
SAW LOWERS TOO FAST:
• The lowering rate of the saw can be adjusted using
the SAW LOWERING SPEED CONTROL KNOB (1U)
at the rear of the saw. If the saw falls too quickly, turn
the knob on the SAW LOWERING SPEED CONTROL
KNOB (1U) CLOCKWISE until an adequate lowering
rate is set.
If the ENGINE or BLADE STALLS, for any reason, raise
the blade completely from the cut, inspect the machine
thoroughly before restarting the engine. When lowering
the blade into a partial cut, align the blade exactly with
the cut to prevent damage to the blade.
Entrust all repairs to your authorized
dealer only.
9 Adjustments: Straight Line Sawing
(See Figures 1 and 4)
While cutting, the saw may steer to the right from the
required straight line marked on the cutting surface (if
the DIAMOND BLADE (2E) is installed on the right hand
side). If this occurs, the Rear Axle (4E) of the saw can
be pivoted to compensate for this situation.
Front Pivot Model (Saw with Electric Tracking option):
• Push AXLE ADJUSTMENT SWITCH (1J) to the LEFT.
Small short adjustments make large changes.