


F-34
TROUBLESHOOTING AND REPAIR
F-34
LN-10
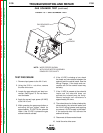
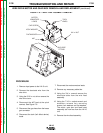
8. Using the Phillips head screwdriver
remove the two screws holding the
solenoid to the bracket. Remove the
solenoid.
9. Mount the new solenoid onto the
bracket using the two Phillips head
screws.
10. Install the solenoid assembly into the
LN-10.
11. Connect the gas hose.
12. Connect the two wires previously
removed. Be sure the leads are
connected to their original positions.
13. Install the wire drive cover and connect
the input gas line.
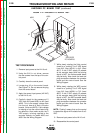
PROCEDURE
1. Remove input power to the LN-10 unit.
2. Using the 5/16 in. nut driver, remove
the wire drive cover.
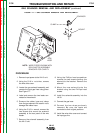
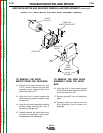
3. Locate the gas solenoid assembly and
remove the input gas lines using pliers.
See Figure F.7.
4. Label and remove the two leads con-
nected to the solenoid.
5. Remove the rubber hose and clamp
from the gas solenoid. Be careful not to
damage the rubber hose.
6. Using the 5/16 in. wrench remove the
two screws that mount the solenoid
assembly to the rear panel of the wire
feeder.
7. Remove the solenoid assembly from
the LN-10 unit.
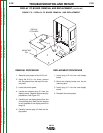
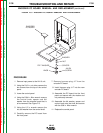
FIGURE F.7 — GAS SOLENOID REMOVAL AND REPLACEMENT.
GAS SOLENOID REMOVAL AND REPLACEMENT (continued)
NOTE: WIRE FEEDER SHOWN WITH
DRIVE MOTOR ASSEMBLY
REMOVED FOR CLARITY
LINCOLN
ELECTRIC
SOLENOID
MOUNT
GAS
HOSE
CLAMP
Return to Section TOC Return to Section TOC Return to Section TOC Return to Section TOC
Return to Master TOC Return to Master TOC Return to Master TOC Return to Master TOC