


F-42
TROUBLESHOOTING AND REPAIR
LN-10
F-42
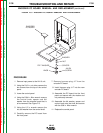
PROCEDURE
1. Remove input power to the LN-10 unit.
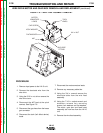
2. Remove the reed switch plug from the front of the
machine. See Figure F.11.
3. Remove the Reed Switch Cover. See Figure F.11.
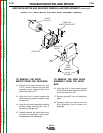
4. Using a 3/4” socket, remove the two nuts from the
copper energizer. Remove Reed Switch and cop-
per energizer assembly. Using a slot head screw-
driver, loosen the locking screw and remove the
reed switch from the energizer. Note lead routing for
reassembly. See Figure F.11.
5. Replace Reed Switch into the copper energizer and
tighten locking screw. Mount the assembly to the
machine using 3/4” nuts.
6. Plug in Reed Switch lead to front of machine.
7. Slide Reed Switch cover back on the LN-10.
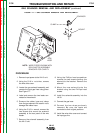
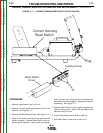
Current Sensing
Reed Switch
Plug
CURRENT SENSING REED SWITCH REMOVAL AND REPLACEMENT (CONTINUED)
FIGURE F.11 — CURRENT SENSING REED SWITCH /PLUG LOCATION.
3\4" Nuts
Reed Switch
Cover
Locking Screw
Return to Section TOC Return to Section TOC Return to Section TOC Return to Section TOC
Return to Master TOC Return to Master TOC Return to Master TOC Return to Master TOC