


C-3
ACCESSORIES
C-3
POWER MIG 255C
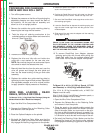
OPERATING INSTRUCTIONS FOR TIMER
KIT
If the optional Timer Kit (K1701-1) is installed, select
the desired mode with the selector switch:
A. Normal Welding mode provides weld power only
while the trigger switch is depressed. This is the
same operation as when the Timer Kit is not
installed.
B. 4-Step Trigger interlock mode eliminates the need
to hold the gun trigger while welding. It operates in 4
steps:
1. Close trigger and establish welding arc.
2. Release trigger and continue welding.
3. Reclose trigger near end of weld.
4. Release trigger again to stop welding.
If the arc is broken while using this feature, the
machine will reset to the "trigger off" condition
automatically.
Note: 4 Step Trigger interlock mode does not function
with a Spool Gun.
C. Spot Weld Mode is is used for tack welding parts
into position or for spot plug welds to hold thin sheet
metal together prior to manual stitch or continuous
welding. To use this feature, adjust the On-Time (0-
5 seconds) as appropriate to obtain the desired
results. Closing the trigger initiates a single timed
spot weld cycle.
Plug welds are made by using a punch to make a
3/16" (5 mm) diameter hole in the top sheet and arc
welding through the hole into the back sheet.
To make spot plug welds, punch 3/16" (5 mm) holes
in the top sheet. Set the Spot Time control to
approximately 1.2 seconds and set the procedure
for the metal thickness to be welded. Install spot
weld nozzle (if available) on gun and press it
against the top sheet so the top and bottom sheets
are tight together. Close trigger and hold it closed
until the arc goes out. If a spot weld nozzle is not
used, smoother welds will result by moving the
welding wire in a small circle during the weld.
D. Burnback Time control provides manual
adjustment of the burnback time (0-250
milliseconds) for any selected welding mode. this
control should be set as low as possible without the
wire "sticking" in the puddle after each weld. Too
long of a burnback time may form a "ball" on the
end of the wire, or may "flash back" to the gun tip.
E. Run-In Mode is used to adjust the starting wire
feed speed. Starting conditions for certain welding
applications can be improved with adjustment to
the Run-In speed. The control allows for initial
starting speeds from 50 - 150 IPM. After the arc is
started, the set point on the wire feed speed control
will dominate. Note that the Run-in is not functional
with the spool gun. Also note that if Run-in is set
fully counter clockwise to "OFF", Run-in speed will
equal the preset WFS on the machine.
SPOOL GUN
Remove all input power to the POWER MIG 255C
before proceeding.
-----------------------------------------------------------------------
The POWER MIG 255C provides direct connection
and use of the Spool Gun (with remote speed control).
It also provides gun trigger switch transfer between the
machine’s use with its feeder gun or the spool gun for
same polarity welding with different wire and gas
processes.
K2297-2 Prince
®
XL Spool Gun
K487-25 Magnum
®
SG Spool Gun (requires K2445-1
Cable Adapter)
K2445-1 Magnum SG Spool gun Control Cable
Adapter
Allows the K487-25 Magnum SG spool gun’s 6-pin control
cable plug to connect to the Power MIG 255C’s 7-pin spool
gun control cable receptacle.
K1738-1 Spool Gun Hanger Accessory
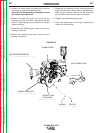
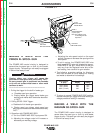
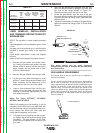
CONNECTING THE SPOOL GUN TO THE
POWER MIG 255C
(See Figure C.1)
1. Connect the Spool Gun control cable to the mating
7-pin receptacle in the Power MIG wire drive
compartment. K487-25 Magnum SG Spool Gun
requires K2445-1 cable 7-pin to 6-pin adapter.
2. Connect the Spool Gun electrode lead to the
(+)positive stud with the Spool Gun electrode lead
sandwiched between the (+)positive power source
electrode lead and the (+)positive stud. Tighten and
be careful not to strip the threads.
3. Attach the Spool Gun gas line to the 5/8 Gas fitting
on the front of the machine.
4. Attach a Gas hose from the Gas supply to the rear
inlet gas fitting on the Power MIG 255C.
Return to Section TOC Return to Section TOC Return to Section TOC Return to Section TOC
Return to Master TOC Return to Master TOC Return to Master TOC Return to Master TOC
WARNING