


MAINTENANCE
D-2D-2
LN-23P
Return to Section TOC Return to Section TOC Return to Section TOC Return to Section TOC
Return to Master TOC Return to Master TOC Return to Master TOC Return to Master TOC
GUN AND CABLE MAINTENANCE
Remove spatter from tip after each ten minutes of arc
time or as required.
Replace worn contact tips and thread protectors as
required.
Replace worn spring liners in nozzles. The life of the
spring can be doubled by rotating it 180°.
Clean cables after using approximately 300 pounds of
electrode. Remove the cable from the wire feeder and
lay it out straight on the floor. Remove the contact noz-
zle tip from the gun. Using an air hose and only partial
pressure, gently blow out the cable from the gun end.
(Too much pressure at the start will cause the dirt to
form a plug.) Flex the cable over its entire length and
again blow out the cable. Repeat this procedure until
no further dirt comes out.
Before any gun is disassembled, remove unit from the
wire feeder or shut off the power source.
WIRE DRIVE ASSEMBLY MAINTENANCE
Every 500 pounds of electrode, the drive roll section
should be inspected and cleaned out if necessary. Do
not use a solvent for cleaning the idle roll as it may
wash lubricant out of the bearing.
Replace drive rolls as required. Drive rolls should be
worn on both sides before replacing. See “A” of this
section.
Check the motor brushes every six months. Replace if
they are less than 1/4" long.
Every year examine the gear box and paint the gear
teeth with moly-disulfide filled grease.
SAFETY PRECAUTIONS
Have qualified personnel do the maintenance
work. Turn the engine off before working inside
the machine. In some cases, it may be
necessary to remove safety guards to perform
required maintenance. Remove guards only
when necessary and replace them when the
maintenance requiring their removal is
complete. Always use the greatest care when
working near moving parts.
-----------------------------------------------------------------------
ELECTRIC SHOCK can kill.
• Do not touch electrically live parts or
electrode with skin or wet clothing.
• Insulate yourself from work and
ground
• Always wear dry insulating gloves.
------------------------------------------------------------------------
See additional warning information
throughout this operatorʼs manual and
the Engine manual as well.
-----------------------------------------------------------
WARNING
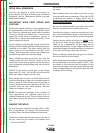
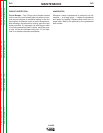
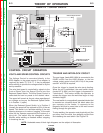
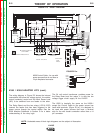
REPLACING OR REVERSING DRIVE ROLLS (See
Figure D.1)
Loosen idle roll tension screw (Item 1) to release pres-
sure between idle roll and drive rolls.
Remove hex head screw (Item 2) with a 1/2" wrench
and remove the drive roll clamping collar (Item 3).
Remove drive rolls from shaft.
Wipe the drive roll surfaces clean. Then install new
drive rolls. If reversing drive rolls, turn drive rolls over so
unworn teeth face each other.
Replace clamping collar and hex head screw.
Tighten the idle roll tension screw until it bottoms and
then back it out two complete turns. If feeding problems
persist, do not increase the tension. check for other
issues such as the wire spool binding or a dirty or dam-
aged gun cable
REMOVING IDLE ROLL ASSEMBLY
Remove the idle roll tension screw (Item 1), tension
spring retainer (Item 4), and tension spring (Item 5).
Pivot the idle roll assembly away from the gearbox and
lift it off the pivot pin (Item 6).
To re-assemble, replace idle roll assembly, tension
spring, retainer, and tension screw. Adjust the tension
screw as described above.
23
614
5
IDLE ROLL TENSION
ADJUSTING SCREW
FIGUIRE D.1