


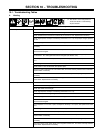


TM-499 Page 32
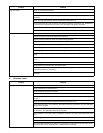
Trouble Remedy
High weld output. Check Current Control R1 setting.
Check engine speed, and adjust if necessary (see Section 7-4 or 7-5).
Check resistance and connections of suppressor VR1/R2. R2 is 1000 ohms ±5%. Replace VR1/R2 if
necessary.
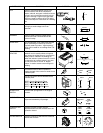
Check slip rings, and install new brushes if necessary (see Section 10-7).
Check control board PC1 and connections, and replace if necessary (see Section 10-5). Replace PC1
if shorted across receptacle RC4 pins 4 and 6. PC1 LED lights when board is energized.
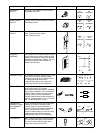
Check capacitor C1 replace if open. If C1 is open, also replace circuit board PC1.
Check diodes in main rectifier SR2, and replace if shorted.
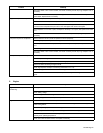
Erratic weld output. Check Current Control R1 setting.
Tighten and clean connections to electrode and workpiece.
Tighten and clean connections inside and outside welding generator.
Use dry, properly-stored electrodes for SMAW.
Check engine speed, and adjust if necessary (see Section 7-4 or 7-5).
Check throttle/governor linkage for smooth, non-binding operation.
Check slip rings, and install new brushes if necessary.
Check control board PC1 and connections, and replace if necessary. PC1 LED lights when board is ener-
gized.
Check capacitor C1 for a short or open, and replace if necessary. If C1 is open, also replace circuit board
PC1.
Check integrated rectifier SR1, and replace if necessary.
Check diodes in main rectifier SR2, and replace if open.
Check stabilizer L1 for signs of winding failure. Check continuity across windings, and check for proper
connections. Replace L1 if necessary.
Disconnect leads 3 and 4 from brushes, and check continuity across slip rings. Replace rotor if
necessary.
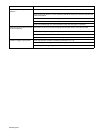
B. Generator Power
Trouble Remedy
No output at ac receptacles. Reset circuit breakers (see Section 6-1).
Check connections to control board PC1.
Check receptacle wiring and connections.
Check resistance and connections of resistor R3; R3 is 20 ohms ±5%. Replace R3 if necessary.
Check engine speed, and adjust if necessary (see Section 7-4 or 7-5). Output stops if engine speed is
too low.
Check slip rings, and install new brushes if necessary (see Section 10-7).
Check control board PC1 and connections, and replace if necessary (see Section 10-5). PC1 LED lights
when board is energized.
Check engine lamp coil and connections, and replace coil if necessary. Lamp coil supplies power to con-
trol board PC1. PC1 LED lights when board is energized.
Check capacitor C1 for a short or open, and replace if necessary. If C1 is open, also replace circuit board
PC1.
Check integrated rectifier SR1, and replace if necessary.
Check diodes in main rectifier SR2, and replace if open.
Disconnect stator generator power leads from connection block 1T, and check continuity between gener-
ator power leads 1 and 3, and leads 2 and 4. Replace stator if necessary.