


10
Unpacking and Checking Contents
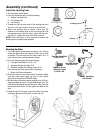
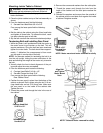
Tools Needed
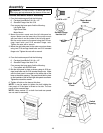
Unpacking
WARNING: To reduce the risk of injury from unex-
pected starting or electrical shock, do not plug the
power cord into a power source outlet during unpack-
ing, until all assembly steps are complete, and you
have read and understand the safety and operating
instructions.
WARNING: This tool is heavy. To reduce the risk of
back injury, get help whenever you have to lift the tool.
Your jointer/planer is shipped complete in one carton and
includes a steel cabinet.
1. Remove the parts from the carton. Lift the bed assem-
bly at the bottom of the base.
2. Place the tool on a secure, stationary work surface and
look it over carefully.
3. Separate all parts from packing materials and check
each one with the “Table of Loose Parts” and the “List
of Loose Parts” to make certain all items are
accounted for before discarding any packing material.
If you are missing any parts, check packing material
for those items.
WARNING: If any parts are missing, do not attempt
to assemble the jointer/planer. Do not plug in the
power cord or turn the switch on until the missing parts
are obtained and are installed correctly.
4. Contact an Authorized Service Center to get the miss-
ing parts. Use the “Repair Parts” pages at the end of
this manual to identify the part number of the missing
parts after completing the “Unpacking and Checking
Contents section.
WARNING: The cutting knives are extremely sharp.
Do not touch the cutter knives to prevent serious
injury.
5. The top of the table and the front of the fence are cov-
ered with a protective coating. These surfaces must be
cleaned before using the jointer/planer. Clean these
surfaces with a general purpose solvent, such as min-
eral spirits. Water will rust the surfaces. Do Not use
water, soapy water or water based cleaners.
WARNING: Use solvents according to the instruc-
tions on their package. Use only in well ventilated
areas, away from flames, sparks or heat sources. Do
not use solvents in closed areas to prevent serious
injury.
Protect the exposed surfaces with wax. Paste wax
or automotive wax are both good for this job. The
wax will protect the surface from rust and will
make it easier to slide the wood along the table
and fence. Automotive wax is best as it will not rub
off on the wood.
6. Wipe all parts thoroughly with a clean, dry cloth.
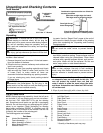
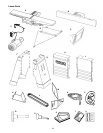
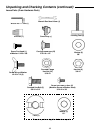
List of Loose Parts
NOTE: Before beginning assembly, check that all parts
are included. If you are missing any part, do not assem-
ble the tool. Call 1-866-5391710 to get the missing
part. Sometimes small parts can get lost in packaging
material. Do not throw away any packaging until jointer/
planer is put together. Check packaging for missing
parts before contacting RIDGID. A complete parts list
(Repair Parts) is at the end of the manual. Use the list
to identify the number of the missing part.
The following parts are included:
Item Part Name Qty.
A Jointer Bed Assembly..................................... 1
B Fence Assembly............................................. 1
C Motor Assembly w/Switch............................... 1
D Motor Mount Bracket ...................................... 1
E Sawdust Chute ............................................... 1
F Left Side Panel ............................................... 1
G Right Side Panel............................................. 1
H Front Panel..................................................... 1
J Rear Panel ..................................................... 1
K Pulley Guard................................................... 1
L V-Belt.............................................................. 1
M Angle Gauge .................................................. 1
N Cutter Guard................................................... 1
P Handwheel ..................................................... 1
Q Fence Lock Knob ........................................... 1
R Fence Tilt Knob .............................................. 1
S Push Blocks.................................................... 2
T Operator’s Manual.......................................... 1
U Hardware Pack................................................*
* Quantity of hardware pack may vary.
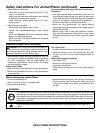
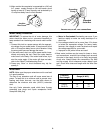
2 Ft. Straight Edge
Phillips Screwdriver
Combination
Square
(12"Blade)
Select the straight edge of a board.
Draw light line on
board along edge
This edge must be perfectly straight.
Should be no gap or overlap here when
square is flipped over in dotted position
Adjustable Wrench
1/2" Open End Wrench
Combination square must be true. Check its
accuracy as shown
5/16" Hex “L” Wrench