


30
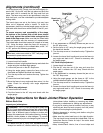
Planing
WARNING: To avoid risk or injury from cutterhead
contact, always use push blocks when planing.
• Follow all instructions above for “Feeding the Work-
piece”.
• Keep fingers close together so they do not hang down
toward the knives.
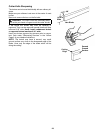
Planing is removing wood from the widest surface or face
of a board so as to make it flat and smooth.
Planing on a jointer will not necessarily make the face
that is planed square or parallel to any other surface.
Planing on a jointer only smooths and flattens. If you are
planing and jointing a board, the planing operation should
be performed first. This allows the jointed edge to be cut
square to the face which was previously planed flat and
smooth.
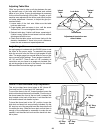
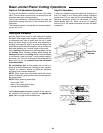
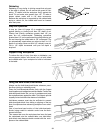
Jointing
Jointing is the removal of wood along the edge of a piece
of wood so as to make that edge straight, smooth and
square to the wood face which is against the fence.
To ensure a square cut, the workpiece face must be held
flat against the fence throughout the entire cut.
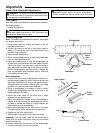
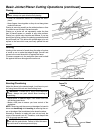
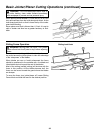
Beveling/Chamfering
Adjust the fence to the desired angle. Lock fence in posi-
tion using fence tilt knob and fence sliding knob.
WARNING: To avoid risk or injury from cutterhead
contact, always use push blocks when beveling or
chamfering.
• Adjust fence to desired angle. Lock fence lock knob
and sliding guard knob.
• Make a test pass to assure you have control of the
workpiece.
NOTE: Removing only the corner on the edge of a board is
known as chamfering while beveling is removing the cor-
ner or the edge of the board down to the board’s surface.
Normally a chamfer is made with one cut and only the
corner of the wood is cut off. Therefore, a cut deeper that
1/16 of an inch may be made.
WARNING: Do not contact the cutting knives or the
guard with the push-blocks. Failure to heed this warn-
ing could result in serious personal injury.
Jointing Without Push Blocks
Bevel
Chamfer
Fence Tilt
Knob
Basic Jointer/Planer Cutting Operations (continued)