


4
Safety Instructions For Jointer/Planer (continued)
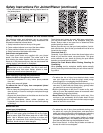
• Find and read the following warning labels found on
the jointer/planer:
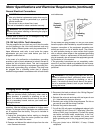
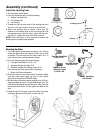
Safety Labels and Indicators on the Jointer/Planer
The following labels and indicators are on your jointer/
planer. Locate, read and follow the safety instructions and
information contained in these labels.
1. Safety instruction label on the top of the guard.
2. Cutter rotation indicator is on top of the fence holder.
3. Cutter position indicator is on top of the fence.
4. Safety instruction label below dust chute.
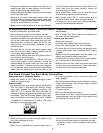
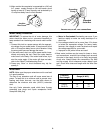
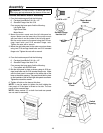
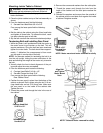
Push blocks and push sticks
Two plastic push blocks are supplied with your jointer/
planer. Use them when practical. The rubber sole of the
push blocks give better traction with the wood than your
hands do. If they become slippery, they can be cleaned with
rubbing alcohol, paint thinner or sandpaper.
CAUTION: Use rubbing alcohol or paint thinner only
as described on their containers. Use only in well venti-
lated areas away from open flames, sparks or heat
sources to prevent serious personal injury.
Push blocks can’t always be used. With larger workpieces,
you may have better control of the workpiece using your
hands. Always make a test pass first to determine which
method gives you better control.
Before you make any cut, plan your hand positions. If a kick-
back should occur, plan so that your hands will not fall or be
forced into the cutters.
Three Inch Rule (3")
Generally, if your hands are closer than three inches to the
blade as you feed the wood, use push blocks. This gives
extra protection to your hands by placing the push blocks
between your hands and the cutters.
Always Use Push Blocks When Planing, Beveling Or
Chamfering
When jointing, test for workpiece stability before actually
jointing, and use push blocks when you can without sacrific-
ing control.
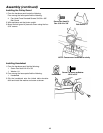
When Installing Or Moving the Jointer/Planer
Reduce the Risk of Dangerous Environment.
• Use the jointer/planer in a dry, indoor place protected
from rain.
• Keep work area well lighted.
To reduce the risk of injury from unexpected jointer/
planer movement.
• Bolt or clamp the jointer/planer to firm level surface where
there is plenty of room for moving the workpiece through
the entire cut.
• Support the jointer/planer so the tables are level and the
jointer/planer does not rock.
• Put the jointer/planer where neither operators nor
bystanders must stand in line with the wood while planing
or jointing it.
• To reduce the risk of injury from electrical shock, make
sure your fingers do not touch the plug’s metal prongs
when plugging in or unplugging the jointer/planer.
• Turn off and unplug the jointer/planer before moving it to a
new area. To reduce the risk of back injury, get help when
you need to lift or move the jointer/planer.
• Bolt the jointer/planer to the floor if it tends to slip, walk,
slide or tip over. Be especially aware of movement when
jointing/planing long heavy boards.
• Never Stand On Tool. Serious injury could occur if the
tool tips or you accidentally hit the cutter head. Do not
store anything above or near the tool where anyone might
stand on the tool to reach them.
Before Each Use
Inspect your jointer/planer.
WARNING: The 2-1/2 inch jointer/planer pulley and
the 3-1/2 inch motor pulley furnished will run the cutter
head at about 5000 RPM when used with a 3450 RPM
motor. Use of different types of pulleys or motors will
change this speed and could cause jamming, binding,
kickback, thrown knives or other dangers.
• To reduce the risk of injury from accidental starting, turn
the switch off, unplug the jointer/planer, and remove the
switch key before moving the cutter head guard, changing
the blades, changing the setup, or adjusting anything.
• Check for alignment of moving parts, binding of moving
parts, breakage of parts, unit stability, and any other condi-
tions that may affect the way the jointer/planer works.
• Don’t force the tool. It will do the job better and safer at
the rate for which is was designed.