


Specifications
2–2
TDS 500D, TDS 600B & TDS 700D Performance Verification and Specifications
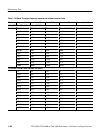
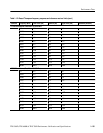
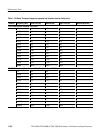
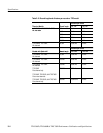
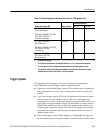
Table 2–1: Key features of the TDS 500D, 600B and 700D oscilloscopes (cont.)
Feature TDS 500D & TDS 700DTDS 600B
Storage Floppy disk drive:
1.44 Mbyte, 3.5 inch, DOS 3.3-or-later floppy disk drive
Internal hard disk drive
(optional on the TDS 500D and 700D)
Iomega Zip drive compatible
NVRAM storage for saving waveforms, hardcopies, and setups
I/O Full GPIB programmability.
Hardcopy output using GPIB, RS-232, or Centronics ports
1
Two plus Two channel operation allows up to two of the four channels to be
displayed simultaneously. Channels not displayed can be used to couple a
triggering signal to the oscilloscope.
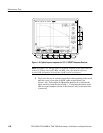
User Interface
Use a combination of front-panel buttons, knobs, and on-screen menus to control
the many functions of the oscilloscope. The front-panel controls are grouped
according to function: vertical, horizontal, trigger, and special. Set a function you
adjust often, such as vertical positioning or the time base setting, directly by its
own front-panel knob. Set a function you change less often, such as vertical
coupling or horizontal mode, indirectly using a selected menu.
Pressing one (sometimes two) front-panel button(s), such as vertical menu,
displays a main menu of related functions, such as coupling and bandwidth, at
the bottom of the screen. Pressing a main-menu button, such as coupling,
displays a side menu of settings for that function, such as AC, DC, or GND
(ground) coupling, at the right side of the screen. Pressing a side-menu button
selects a setting such as DC.
On-screen readouts help you keep track of the settings for various functions,
such as vertical and horizontal scale and trigger level. Some readouts use the
cursors or the automatic parameter extraction feature (called measure) to display
the results of measurements made or the status of the instrument.
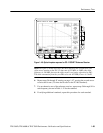
Assign the general purpose knob to adjust a selected parameter function. More
quickly change parameters by toggling the SHIFT button. Use the same method
as for selecting a function, except the final side-menu selection assigns the
general purpose knob to adjust some function, such as the position of measure-
ment cursors on screen, or the setting for a channel fine gain.
Menus
Indicators
General Purpose Knob