


3-24
Cisco ASR 901 10G Series Aggregation Services Router Hardware Installation Guide
OL-28105-02
Chapter 3 Installing the Cisco ASR 901 10G Router
Powering on the Router
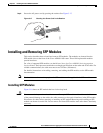
Note If your Cisco ASR 901 10G router is front-mounted, you can use the cable guide (found in the accessory
kit) to dress the cables.
To continue the installation, proceed to the next section, “Powering on the Router.”
Powering on the Router
Warning
Do not touch the power supply when the power cord is connected. For systems with a power switch,
line voltages are present within the power supply even when the power switch is off and the power
cord is connected. For systems without a power switch, line voltages are present within the power
supply when the power cord is connected.
Statement 4
Warning
This equipment is intended to be grounded. Ensure that the host is connected to earth ground during
normal use.
Statement 39
Checklist for Power on
Complete these steps to power on the Cisco ASR 901 10G router:
• Securely mount the router.
• Properly connect the power, network, and interface cables.
Interpreting Front-Panel LEDs
The Cisco ASR 901 10G router provides a number of LEDs on the front panel to monitor conditions and
to aid in troubleshooting problems. For a description of the LEDs, see the “Reading the LEDs” section
on page A-4.
Power-On Procedure
Complete these steps to power on the Cisco ASR 901 10G router and verify its initialization and
self-test:
Step 1 Remove the tape from the circuit breaker switch handle.
Step 2 Restore power by moving the handle of the circuit breaker to the ON position.
The LED (labeled POWER) on the front panel should go ON and the fans should begin to operate.
Depending on your installation, other front-panel LEDs can also come on.
Note When the Cisco ASR 901 10G router (DC unit) is powered ON, it takes about 30 seconds for the system
LED to turn ON.