


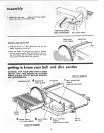

" rge ng to know you belt and disc
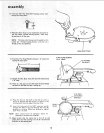
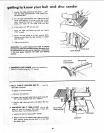
f Loosen the table positioning lock screw., . posi-
tion the table approximately 1/16" awa_ from
the abrasive disc.
g. Tilt the table downward but don't tighten the ock
screw, and position it as close to the disc as pos-
sibte. Using the head of a combination square,
check the angle of the table with the disc,
h. If the table is not 45 ° with the disc:
sander
/
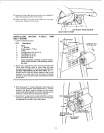
i. Raise the table and loosen the lock nut using a
7/16" wrench.
j, Screw the stop screw in or out, using a 3/8'"
wrench so that when the table touches it, it is 45°
with the disc.
k. Tighten the lock nut.
WARNING: To avoid trapping the work or fingers
between the table and sanding surface, the table must
be repositioned on the rod to maintain a maxtmum
1/16 inch space between the table and sanding
surface,
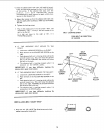
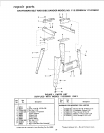
STOP SCREW
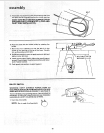
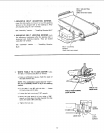
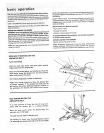
4. BACKSTOP LOCK SCREW locks the backstop in
place. It is locked u_ing the 1/2"' wrench,
BACKSTOP
LOCK SCREW
\
BACKSTOP
5. BELT TABLE LOCKING BOLTS ... lock the
belttable in position.
To adjust to vertical position:
a. Remove the backstop.
b. Loosen the two belt table locking bolts using the
1/2" wrench supplied with your machine.
c. Position belt table vertically and tighten the two
bolts.
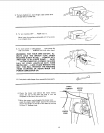
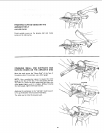
6, ABRASIVE BELT TABLE STOP can be adj-
usted so that the abrasive belt table is level with
the floor when in a horizontal position.
a, Loosen the lock nut using a 3/4"" wrench.
BELT TABLE
LOCKING BOLT/
b, Place a level on the abrasive belt table and usinga
314" wrench, screw the stop bolt in or out until
the table is level.
LOCK NUt
STOP BOLT
18