


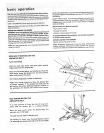
basic operation
BEFORE USING THE SANDER:
WARNING: Toavoid mistakes that could cause serious, per-
manent injury, do not plug the sander in until the following
steps are completed.
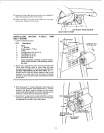
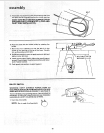
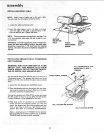
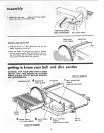
o Assembly. (See pages 7 - 16.)
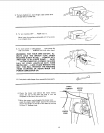
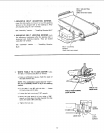
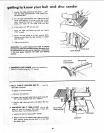
" Learn the use and function of the ON-OFF switch,
backstop lock screw, belt adjusting screws, belt bcking
screws, work table and work table tilt lock screw. (See
pages 16- 18,)
o Review and understanding of all safety instructions and
operating procedures in this manual.
o Review of the maintenance methods for this sander,
(See page 22.)
BEFORE EACH USE:
Inspect your sander.
DISCONNECT THE SANDER. To avoid injury from accidental
starting, unplug the sander, turn the switch off and remove
the switch key before changing the setup, sanding disc or
belt or adjusting anything.
CHECK DAMAGED PARTS. Check for:
e alignment of moving parts,
• binding of moving parts,
• broken parts,
• stable mounting, and
t any other conditions that may affect the way the sander
works.
If any part is missing, bent, or broken in any way, or any
electrical parts don't work properly, turn the sander off and
unplug the sander. REPLACE damaged, missing, or failed
parts before using the sander again
MAINTAIN TOOLS WITH CARE. Keep the sander clean for
best and safest performance. Follow instructions for lubri=
caring.
REMOVE ADJUSTING KEYS AND WRENCHES from tool
before turning it on.
To avoid injury from jams, slips or thrown pieces:
• USE ONLY RECOMMENDED ACCESSORIES. (See
page 22.) Consult this Owner's manual for recommended
accessories. Follow the instructions that come with the
accessories. The use of improper accessories may
cause risk of injury to persons.
= Adjust table to clear the sanding surface by no more than
1/16 of an inch.
• Make sure all clamps and locks are tignt and no parts have
excessive play.
= KEEP WORK AREA CLEAN. Cluttered areas and benches
invite accidents, Floor must not be slippery.
To avoid burns or other fire damage, never use the sander
'lear flammable liauids, vapors or gases.
Plan ahead to protect your eyes, hands, face, ears.
KNOW YOUR SANDER. Read and understand the owner's
manual and labels affixed to the tool, Learn its application
and limitations as well as the specific potential hazards pecu-
iar to this tool.
To avoid injury from accidental contact with moving parts,
don't do layout, assembly, or setup work on the sander while
any parts are moving.
AVOID ACCIDENTAL STARTING. Make sure switch is " OFF"
before plugging sander into a power outlet.
Plan your work.
USE THE RIGHTTOOL. Don't force tool or attachment to do a
job it was not designed to do.
CAUTION: This machine is not designed for heavy deburring
operations, When finishing metals, sparks or hot fragments
could cause a fire. To avoid this, disconnect any dust col-
lecting hose from the san der. Also, remove all traces of wood
dust from inside dust traps in the sander.
Dress for safety.
Any power sander can throw foreign objects into the eyes. This
can cause permanent eye damage. Wear safety goggles (not
glasses) that comply with ANSI Z87.1. Everyday eyeglasses
have only impact resistant lenses. They are not safety glasses.
Safety goggles are available at Sears retail catalog stores.
Glasses or goggles not in compliance with ANSI Z87,1 could
seriously hurt you when they break.
= Do not wear loose clothing, gloves, neckties or jewelry
(rings, wrist watches). They can get caught and draw you
into moving parts.
• Wear nonslip footwear.
° Tie back long hair.
o Roll long sleeves above the elbow.
• Noise levels vary widely. To avoid possible hearing dam-
age, wear ear plugs or muffs when using sander for hours at
a time.
° Sanding operations are usually dusty. Wear a dust mask
along with the safety goggles,
Inspect your workplace.
Make sure there are no nails or foreign objects in the part of
the workpiece to be sanded.
Plan your work to avoid THROWBACKS--when the work-
piece catches on the sanding belt or disc and istorn fro m you r
hands.
• Make sure there's no debris between the workplace and its
supports:
° When sanding irregularly shaped workpieces, plan your
work support so it will not slip and be pulled from your
hands.
Use extra caution with large, very small or awkward work-
pieces:
• Never use this tool to finish pieces too small to hold by
hand,
• Use extra supports (tables, saw horses, blocks, etc.) for
any workpieces large enough to tip when not held down to
the table top.
,, NEVER use another person as a substitute for atable exten-
sion, or as additional support for a workpiece that is longer
or wider than the basic sander table, or to help feed, sup-
port or pull the workpiece.
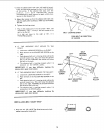
o When finishing on the Disc, always press the workpiece
against the "Down" side of the disc. Sanding against the
side coming up from under the table could damage the
work by making it "chatter;' or tear the work from your
hands and throw it,
• Sand only one workpiece at a time.
• Clear everything except the workpiece and feinted support
devices off the table before turning the sander on.
19