


" rt
operaho
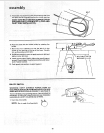
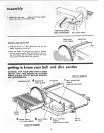
Plan the way you will hold the workpiece from start to finish
Avoid awkward operations and hand positions Where a sud-
den s p cou d cause fingers or hand to move into a sanding
surface, Keep fingers away from where the belt goes into the
dust trap-
DON'T OVERREACH, Keep good footing and balance,
Keep your face and body to one side. out of line with a pos-
sible throwback.
WHENEVER SANDER IS RUNNING-
WARNING: Don't let familiarity (gained from frequent use of
your belt and disc sander) cause a careless mistake. A care-
less fraction of a second is enough to cause a severe injury.
Before starting your cut, watch the sander while it runs. if it
makes an unfamiliar noise or vibratesa lot, stop immediately,
Turn the sander off, Unplug the sander, Do not restart until
finding and correcting the problem.
Make sure the sanding disc turns counterclockwise before
using the sunder,
KEEP CHILDREN AWAY. Keep aU visitors a safe distance from
the sander. Make sure bystanaers are clear of the sunder and
workpiece.
DON'T FORCE TOOL. it will do the job better and safer at its
designated rate. Press the workoiece against the sanding
material only hard enough to let it sand without bogging
down or binding.
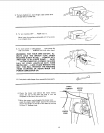
Before freeing any jammed material:
• Turn switch "OFF,"
• Unplug the sanaer.
• Wait for all mov=ng parts to stop.
-fo avoid throwback of the workpiece, use workpiece supports
for all flat surface sanding.
BEFORE LEAVING THE SANDER:
Wait for all moving parts to stop.
Make workshop child-Drool. Lock the shoD. Disconnect
_naster switches. Remove the vetlow switch key. Store ii
away from children and others not qualified to use the tool,
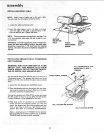
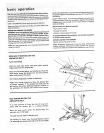
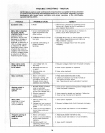
SURFACE FINISHING ON THE
ABRASIVE BELT.
FLATSURFACES
\
\
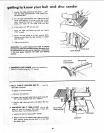
Hold the work piece firmly with both hands, keeping
fingers away from the abrasive belt.
Keep the end butted against the backstop and move the
work evenly across the abrasive belt. Use extra caution
when finishing very thin pieces.
For finishing long pieces, remove the backstop.
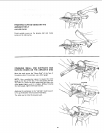
Apply only enough pressure to allow the abrasive belt
to remove material. If the abras=ve belt stalls and the
belt pulleys slip while applying moderate pressure to
the workpiece, the abrasive belt reouires more tension.
/
/
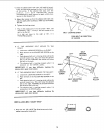
END FINISHING ON THE
ABRASIVE BELT,
I1 is more convient to finish the ends of long work-
pieces with the abrasive belt in a vertical position.
Move the work evenly across the abrasive belt. For
accuracy use a miter guage.
The table may be tilted for beveled work.
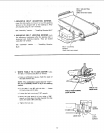
See Getting To Know Your Finishing Machine section
for adjusting the abrasive belt table and the work table,
2O