


electrical requirements
CONNECTING TO POWER SOURCE OUTLET
This machine must be grounded while in use to protect
the operator from electric shock.
Plug power cord into a 120V properly grounded type outlet
protected by a 15-amp. dual element time delay or Circuit-
Saver fuse or circuit breaker.
If you are not sure that your outlet is properly grounded,
have it checked by a qualified electrician.
WARNING: DO NOT PERMIT FtNGERSTO TOUCH THE
TERMINALS OF PLUGS WHEN INSTALLING OR RE-
MOVING THE PLUG TO OR FROM THE OUTLET.
WARNING: IF NOT PROPERLY GROUNDED THIS
POWER TOOL CAN INCUR THE POTENTIAL HAZARD
OF ELECTRICAL SHOCK. PARTICULARLY WHEN USED
IN DAMP LOCATIONS IN PROXIMITY TO PLUMBING.
IF AN ELECTRICAL SHOCK OCCURS THERE IS THE
POTENTIAL OF A SECONDARY HAZARD SUCH AS
YOUR HANDS CONTACTING THE ABRASIVE BELT
OR DISC.
If power cord is worn or cut, or damaged in any way, have
it replaced immediately.
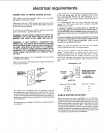
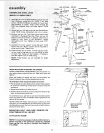
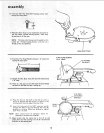
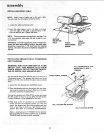
Your unit is wired for 120 volts and has a plug that looks like
the one shown below.
PROPERLY
GROUNDED
OUTLETs, 4
/n Ul
/Do l
\/
3-PRONG
PLUG
GROUNDING
PRONG
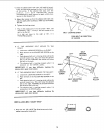
If the outlet you are planning to Use for this power tool is
of the two prong type DO NOT REMOVE OR ALTER
THE GROUNDING PRONG IN ANY MANNER, Use an
adapter as shown and always connect the grounding lug to
known ground.
It is recommended that you have a qualified electrician
replace the TWO prong outlet with a properly grounded
THREE prong outlet.
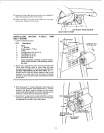
A temporary adapter as shown below is available for
connecting plugsto 2-prong receptacles. The green ground-
ing lug extending from the adapter must be connected to a
permanent ground such as to a properly grounded outlet
box,
A temporary adapter as illustrated is available for connecting
plugs to 2-prong receptacles. The temporary adapter should
be used only until a properly grounded outlet can be
installed by a qualified electrician.
NOTE: The adapter illustrated is for use only if you already
have a properly grounded 2-prong receptacle.
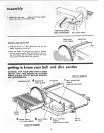
The use of any extension cord will cause some loss of
power. To keep this to a minimum and to prevent over-
heating and motor burn-out; use the table below to deter-
mine the minimum wire size (A.W.G.) extension cord. Use
only 3 wire extension cords which have 3-prong grounding
type plugs and 3-pole receptacles which accept the tools
plug.
GROUNDING LUG
I _ MAKE SURE THIS IS
3-PRONG _ _ I _ " j} CONNECTED TO A
__.,,,_r__..._3_ [_ ]1 2-PR ONG
/ _ RECEPTACLE
ADAPTER
Extension Cord Length
Wire Size A.W.G.
This power tool is equipped with a 3-conductor cord and
grounding type plug, approved by Underwriters' Labora-
tories and the Canadian Standards Association. The ground
conductor has a green jacket and is attached to the tool hous=
ing at one end and to the ground prong in the attachment plug
at the other end.
This plug requires a mating 3-conducto{ grounded type out-
let as shown.
0-25Ft ................... 16
26-50Ft ................... 14
51-100 Ft .................. 12
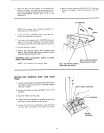
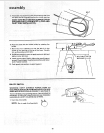
CHECK MOTOR ROTATION
Place the motor on your workbench or on the floor.
Standing clear of the motor shaft, plug the motor cord into a
properly grounded outlet. Notice the rotation of the shaft.
As you look directly at the motor shaft it should be turning in
the counterclockwise direction _ . tf the motor shaft is
turning counterclockwise, remove the plug from the power
outlet and continue the assembly procedures. If the motor is
turning clockwise, remove the plug from the power outlet
and contact your Sears Store immediately,
5