


20 21
20 21
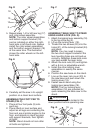
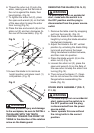
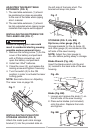
5. Mark an 11 in. square (2) centered
between the four mounting holes (1).
6. Cut out and remove the square.
7. This opening will allow sawdust to
fall through the saw base.
8. Place the saw on the work surface,
and align the mounting holes of the
saw with those drilled through the
surface.
9. Fasten the saw to the work surface.
Do not operate this machine on the
floor. This is very dangerous and
may cause serious injury.
Fig. I
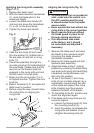
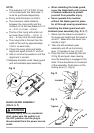
ASSEMBLING THE HANDWHEEL
HANDLE (FIG. J)
Thread the handwheel handle (1) into
the handwheel hole, and then tighten
the nut against the handwheel with a
14 mm or adjustable wrench.
Fig. J
1
WARNING
!
2
1
SQUARE
CUTOUT
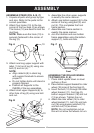
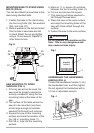
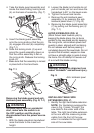
MOUNTING BASE TO STAND USING
BOLTS (FIG. H)
You can also attach the saw base to the
stand using standard bolts.
1. Fasten the base to the stand using
the four long bolts (25), flat washers
(26), and nuts (27).
2. Place a washer on the bolt and insert
thru the hole in saw base and slot
in stand. Attach the nut and tighten
using a 13 mm wrench. Repeat for
other three corners.
Fig. H
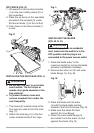
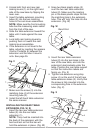
SAW MOUNTED TO WORK
SURFACE (FIG. I)
1. If the leg set will not be used, the
saw must be properly secured to
a sturdy workbench using the four
mounting holes at the base of the
saw.
2. The surface of the table where the
saw is to be mounted must have
a hole large enough to facilitate
sawdust fall-through and removal.
3. Square the saw on the mounting
surface and mark the location of the
four 3/8 in. mounting holes (1).
4. Drill 3/8 in. hole into the mounting
surface.
25
26
27
25
26
27