


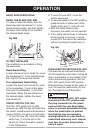


30 31
30 31
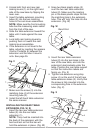
ADJUSTING THE 90° AND 45°
POSITIVE STOPS (FIG. HH, II)
Your saw has positive stops that will
quickly position the saw blade at 90°
and 45° to the table. Make adjustments
only if necessary.
90° Stop
1. Disconnect the saw from the power
source.
2. Raise the blade to the maximum
elevation.
3. Loosen the blade bevel lock handle
and move the blade to the maximum
vertical position and tighten the
bevel lock handle.
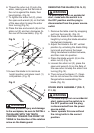
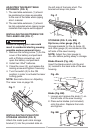
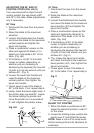
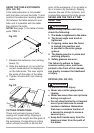
4. Place a combination square on the
table and against the blade (1) to
determine if the blade is 90° to the
table. (Fig. HH)
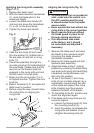
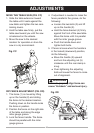
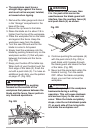
5. If the blade is not 90° to the table,
loosen or tighten (depending on
whether you are increasing or
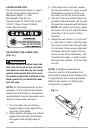
decreasing the degrees) the hex bolt
(3) with a 5 mm hex wrench until you
achieve 90°. (Fig. II)
6. Loosen the bevel lock handle and
reset the blade at the maximum
vertical position, then tighten the
bevel lock handle.
7. Check again to see if the blade is
90° to the table. If not, repeat step 5.
8. Lastly, check the bevel angle scale. If
the pointer does not read 90°, loosen
the screw holding the pointer and
move the pointer so it is accurate at
0° and retighten the pointer screw.
Fig. HH
45° Stop
1. Disconnect the saw from the power
source.
2. Raise the blade to the maximum
elevation.
3. Loosen the blade bevel lock handle
and move the blade to the maximum
bevel position (45°)and tighten the
bevel lock handle.
4. Place a combination square on the
table and against the blade (2) to
determine if the blade is 45° to the
table. (Fig. HH)
5. If the blade is not 45° to the table,
loosen or tighten (depending on
whether you are increasing or
decreasing the degrees) the hex bolt
(4) with a 5 mm hex wrench until you
achieve 45°. (Fig. II)
6. The, loosen the bevel lock handle
and reset the blade at the maximum
bevel position (45°), then tighten the
bevel lock handle.
7. Check again to see if the blade is
45° to the table. If not, repeat step 5.
Fig. II
BLADE TILT POINTER
1. When the blade is positioned at 90°,
adjust the blade tilt pointer to read 0°
on the scale.
2. Loosen the holding screw, position the
pointer over 0° and tighten the screw.
NOTE: Make a trial cut on scrap wood
before making critical cuts. Measure for
exactness.
1
2
45
0
90
0
3
4