


• Theedgeofthesquareandthesawbladeshould
beparallelasshowninfigure17.
• If the frontor beck edge of thesaw bladeangles
away fromthe square as showninfigures 18 and
19, adjustmentsare needed.
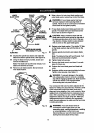
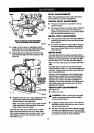
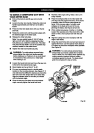
• Usingthe 8 mm hex key provided,loosenthe
sockethead screws thatsecure the mounting
brackettothe mitertable. See Figure20.
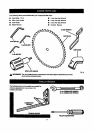
8 mmSOCKET
MITER
TABLE
MOUNTING
8 mmHEXKEY BRACKET
WRENCH Fig.20
• Rotate the mountingbracket left or rightuntilthe
saw blade is parallelwiththe square.
• Retightenthe screws securelyand recheckthe
blade-to-fencealignment,
SQUARING THE BLADE TO THE
MITER TABLE
See Rgures 21-24.
• Unplugyour saw.
_lb WARNING: Failure to unplugyoursaw could
resultin accidental startingcausingpossible
sadous personal injury.
• Pullthe saw arm all the way downand engage
the lock pin to holdthe saw arm intransport
position.
• Loosenthe miterlock handle approximatelyone-
half tum.
• Depressthe miter lockplate and rotatethe miter
table untilthe pointer on the controlarm is posi-
tioned at 0°,
• _ Release the miter lockplate and securelytighten
the miter lock handle.
Loosen bevel lockknoband set saw arm at 0"
bevel (blade set90" to miter table). Tightenbevel
lockknob.
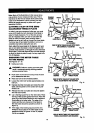
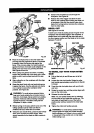
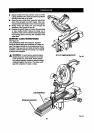
Place a combinationsquare againstthe miter
table and the fiatpart ofsaw blade,
Note: Make sure thatthe square contactsthe flat
part ofthe saw blade, notthe blade teeth.
Rotate the bladeby hand and checkthe blade-to-
table alignmentat severalpoints.
The edge of the square andthe saw blade should
be parallelas shown Infigure21.
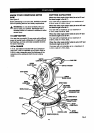
FENCE
MITER
TABLE
COMBINATION
SQUARE
MITER
LOCKHANDLE
CORRECT_EWOFBLADE
SQUAREWITHMITERTABLE
Fig. 21
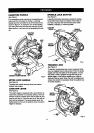
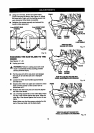
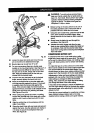
• Ifthe top or bottomofthe saw blade angles away
from the square as showninfigures22 and 23,
adjustmentsare needed.
FENCE
COMBINATION
SQUARE
TABLE
VIEWOFBLADENOTSQUAREW111tMITER
TABLE,ADJUSTMENTSAREREQUIRED
Rg. 22
17