


10
horizontal surface. Use care when driving so to avoid tipping the unit
over in the vehicle. Damage can occur to the unit or surrounding items
if unit is tipped. Use a ramp if loading or unloading the unit from a
height of more than 12".
ALWAYS STORE COMPRESSOR IN A HORIZONTAL POSITION,
ON ALL FOUR RUBBER MOUNTS.
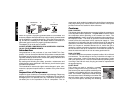
MOVING:
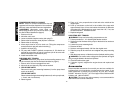
When moving the unit into a position for use, grasp handle grips at rear
of compressor, and lift compressor high enough so unit can be rolled
on the front tire.
WARNING: Ensure proper footing and use caution when rolling
compressor so that unit does not tip or cause loss of balance.
When location is reached slowly lower rear of compressor to ground.
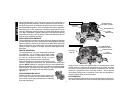
Air Inlet Filter
CAUTION: Do not operate without air inlet filter
General Requirements
The piping, fittings, receiver tank, etc. must be certified safe for at
least the maximum working pressure of the unit. Use hard welded or
threaded steel or copper pipes, cast iron fittings and hoses that are
certified safe for the unit ís discharge pressure and temperature. Use
pipe thread sealant on all threads, and tighten joints thoroughly to
prevent air leaks. DO NOT USE PVC PLASTIC.
CONDENSATE DISCHARGE PIPING
If installing a condensate discharge line, the piping must be at least one
size larger than the connection, as short and direct as possible,
secured tightly and routed to a suitable drain point. Condensate must
be disposed of in accordance with local, state and federal laws and
regulations.
NOTE: All compressed air systems generate condensate that
accumulates in any drain point (e.g. tanks, filter, aftercoolers, dryers).
This condensate contains lubricating oil and/or substances which may
be regulated and must be disposed of in accordance with local, state,
and federal laws and regulations.
English
Operating Procedures
Pre-Start Checklist
1. Ensure the ON/OFF lever switch is in the OFF position.
2. Ensure tank(s) is/are drained so that moisture, dirt, etc. can be
eliminated.
3. Ensure tank pressure gauge reads 0 psi.
4. Ensure safety and drain valve(s) is/are functioning properly.
5. Ensure the drain valve(s) is/are closed.
6. Check oil level in pump.
7. Visually inspect drive belt. Replace belt if frayed, cracked, or worn.
8. Ensure all guards, covers, and labels are in place, legible (for
labels) and securely mounted. Do not use compressor until all items
have been verified.
START-UP
1. Ensure the ON/OFF lever is in the OFF position.
2. Pull out and turn regulator knob counterclockwise until fully closed.
Push in to lock. Regulated pressure gage should read 0 psi.
3. Plug cord into a grounded wall outlet.
WARNING: Make sure that the correct cord plug end is properly
connected to the compressor cordset before operating in 115 or 230
volt mode.
NOTE: For dual control units, ensure the pilot valve is adjusted to the
desired setting (see the Dual Control section in the Common
Procedures).
4. For D55170 and D55180 Only, Rotate manual lock on pilot valve to
an in-line position
5. Turn the ON/OFF lever to the ON position.
6. For D55170 and D55180 Only: Rotate manual lock on pilot valve
to a perpendicular position so pump will charge tanks.
7. Allow compressor to pump up to “cut out” pressure.