


22
308–293
Service
Assembly
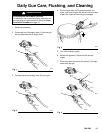
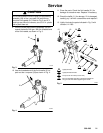
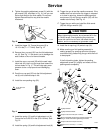
1.
Insert the fluid needle (21) through the front of the
gun as shown in Fig. 6. Install the new packing
assembly (39) by placing them on the end of the
needle tip. Orientate the packings as shown in
Fig. 6.
Fig. 6
02024
21
39
1
Washer
U-cup;
lips face
down
Spreader
2
3
1
2
3
2. Place
the packing adjustment screw (31) over the
packing assembly and start the threads into the
gun. Then remove the needle.
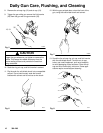
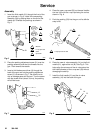
3.
Insert a thin-blade screw driver (A) through the
back of the gun and into the packing adjustment
screw (31) as shown in Fig. 7. Be careful not to
nick or damage parts with the tool. T
urn the screw
with the screw driver (about 3 turns); the packing
will still be loose.
Fig. 7
02110
A
31
4.
Place the new u-cup seal (33) on the seal installa
-
tion tool (42) with the u-cup lips facing the tool as
shown in Fig. 8.
5.
Push the packing (33) into the gun until a definite
snap is felt.
Fig. 8
33
02023
42
1
1
U-cup
lips face the tool
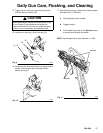
6. Place
the new air valve assembly (14) on the fluid
needle (21), against the nut (B). See Fig. 9. This
helps align the entrance of the air valve stem into
the inside diameter of the u-cup seal (33) without
damaging the seal lip.
7.
Install the fluid needle (21) and the air valve
assembly (14) into the back of the gun.
Fig. 9
21
02108
14
B