


G1022 Series Table Saws -25-
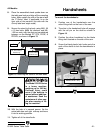
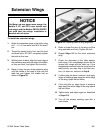
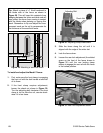
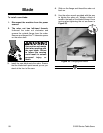
Figure 23. Checking table to wing alignment.
5. Raise or lower the rear of the wing until the
wing and table are flush. Tighten the bolt.
6. Repeat Steps 2-5 for the other extension
wing.
7. Check the alignment of the table against
both wings. Your straightedge should run flat
across both wings and the table top. If the
straightedge contacts both the wings and the
table evenly, you may skip to the next sec-
tion. If it does not, continue to Step 8.
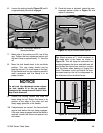
8. If either wing tilts down, remove it and apply
layers of masking tape along the entire edge
of the wing under the bolt holes.
9. If the wing tilts up, apply layers of masking
tape along the entire edge of the wing above
the bolt holes.
10. Tighten bolts and adjust again as described
in Steps 2-5.
11. Trim off the excess masking tape with a
razor blade.
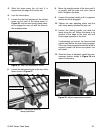
To install the extension wings:
1. Attach the extension wings to the table using
M10 - 1.5 x 25 hex bolts and M10 flat wash-
ers.
2. Thread the center bolt in first, then the front
and back bolts. DO NOT completely tighten
the bolts at this time.
3. Working front to back, align the front edge of
the extension wing with the edge of the table,
so they are flush, and tighten the front bolt.
4. Raise or lower the rear of the extension wing
until the middle of the wing is flush with the
table top and tighten the middle bolt as
shown in Figure 23.
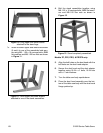
The Model SM has sheet metal wings; the
Models Z, ZF, and ZFX uses slotted cast
iron wings; and the Models PROZ & PROZX
use solid cast iron wings. Installation is
identical with all styles.
NOTICE
Extension Wings