


-50- G1022 Series Table Saws
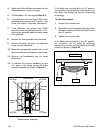
Figure 61. Underside view of
table/trunnion assembly.
4. Make note of the difference between the two
measurements on a piece of paper.
5. Tilt the blade to 45° and repeat Steps 2-4.
6. If the difference was less than 0.004" when
the blade was positioned at 90˚ and 45˚, skip
to the next section. Otherwise, continue on.
7. If the difference was greater than 0.004"
when the blade was positioned at 90˚ or 45˚,
the trunnion assembly below the table needs
to be adjusted.
8. Remove the saw assembly from the stand.
9. Remove the motor, the fence, the extension
wings, and the saw blade.
10. Place the saw assembly upside down on 4x4
blocks to allow the saw blade to rotate freely.
11. Remove the handwheels and the sheet
metal body.
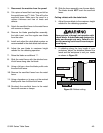
12. To maintain the trunnion assembly as one
unit, place a bar clamp across the entire
trunnion assembly as shown in Figure 61.
If the blade was not parallel in the 90˚ position,
the correction can be made by loosening the trun-
nion bolts and shifting the internal components
accordingly.
To shift the trunnion:
1. Loosen the trunnion bolts.
2. Move the trunnion assembly according to the
difference measured when the blade was in
the 90˚ position.
3. Tighten the trunnion bolts.
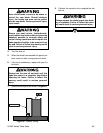
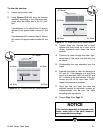
If the blade was not parallel in the 45˚ position,
the correction can be made by shimming
between the trunnion and the bottom of the table
surface as shown in Figure 62.
Clamp Here
Clamp Here
Trunnion
Bolts
Trunnion
Bolts
#1 Shim
#3 Shim
#4 Shim
#2 Shim
Figure 62. Shim placement.
Shim
Trunnion
Table Bottom