


G0644 15" Open-End Wide Belt Sander
-33-
Sanding Drum &
Conveyor Parallelism
The sanding drum and conveyor must be parallel
to one another to obtain accurate sanding results.
This setting is made at the factory and should not
have to be made again. However, if it is necessary
to adjust the sanding drum and conveyor parallel
to each other, follow the procedure below.
This process involves multiple accurate measure
-
ments, patience, and trial-and-error. The goal is to
bring the sanding drum and conveyor parallel to
one another within 0.005" from side-to-side.
Using a dial indicator is probably the most accu
-
rate method of taking measurements for this pro
-
cedure. However, you can use gauge blocks and
feeler gauges to attain acceptable results.
To make gauge blocks, square up a 7' long 2x4
(refer to your jointer manual for detailed instruc-
tions), then cut it in half.
To check the sanding drum and conveyor par
-
allelism:
1. DISCONNECT THE SANDER FROM
POWER!
2. Remove the sanding belt from the sander.
3. Record the precise measurements between
the lowest point of the sanding drum and the
conveyor from side-to-side.
— If the measurements differ more than 0.005"
from side-to-side, continue to the next set
of steps to adjust the sanding drum and
conveyor parallelism.
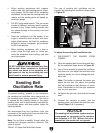
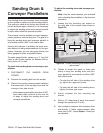
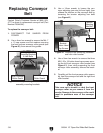
Figure 35. Column mounting cap screws and
jack screws.
Mounting
Cap
Screws
Mounting
Cap
Screws
Jack Screws
To adjust the sanding drum and conveyor par-
allelism:
Note: Use the measurements you recorded
when checking the parallelism in the previous
procedure.
1. Loosen the four mounting cap screws on
the right side of the column base shown in
Figure 35.
conveyor & drum parallel
2. Tighten or loosen the upper or lower jack
screw to bring the sanding drum and con
-
veyor parallel to one another to within 0.005"
from side-to-side.
— To raise the left side of the sanding drum
up, tighten the upper jack screw.
—To lower the left side of the sanding drum,
tighten the lower jack screw.
3. Evenly re-tighten the four mounting cap
screws.
4. Plane a 15" wide piece of stock, then send it
through the sander until it is flat.
5. Use a caliper to measure this workpiece from
side-to-side. If these measurements differ
more than 0.005", repeat Steps 1–4 until you
are satisfied.