


SECTION
10—
MAINTENANCE
A
10-1.
ROUTINE MAINTENANCE
(Table
10-1)
IMPORTANT:
Every
six
months inspect
the labels
on
this
unit
for
legibility
All
precautionary
labels
must
be
maintained
in
a
clearly
readable
state
and replaced
when
necessary.
See
Service
Parts
Manual
for
part
number
of
precautionary
labels.
WARNING:
ELECTRIC
SHOCK
can
kill.
•
Do
not
touch
live
electrical
parts.
•
Shut
down
wire
feeder and
welding
power
source,
and
disconnect
input
power
employ
-
ing
lockout/ta
ggin9 procedures
before
in
-
spectIng,
maintaining,
or
servicing.
Lockout/tag9ing procedures
for wire
feeder
consist
of
disconnecting
interconnecting
cord,
and
for
welding
power
source
consist
of
pad
-
locking
line
disconnect switch
in
open
position,
removing fuses
from
fuse box,
or
shutting
off
and
red-tagging
circuit
breaker
or
other
discon
-
necting device.
Stop
engine,
and
disconnect
negative
(—)
battery
cable
from battery
on
weld-
ing
generators.
•
Allow
gun
and
unit
to
cool before
touching.
•
Do
not
depress
gun
trigger
while
performing
maintenance
on
gun.
Troubleshooting
to
be
performed
only
by
quali
-
fied
persons.
Table
10-1.
Maintenance
Schedule
Frequency*
Maintenance
Every
Month
Units in
heavy
service
environ
ments:
Check labels,
weld
cables,
clean internal
parts
and
drive
rolls.
Every
6
Months
Check
all
labels
(see
IMPORTANT
block,
Section
10-1).
Inspect
q
un
and
cables
(Section
10-1
B).
Clean
drive rolls
(Section
l0-lC).
*Frequency
of
service
is
based
on
units
operated
40
hours
per
week.
Increase
frequency
of
maintenance
if
usage
exceeds
40
hours
per
week.
A.
Internal
Cleaning
A
ARNING:
Read
and
follow
safety
informa
-
tion
at
beginning of
entire
Section
10-1
be
-
fore
proceeding.
Every
month,
blow
our
or
vacuum
dust
and
dirt
from
the
inside
of
the
wire
feeder.
Remove
the
outer
enclosure,
and
use
a
clean, dry
airstream
or
vacuum
suction
for
the
cleaning
operation.
If
dusty
or
dirty
conditions
are
pre-
sent,
clean
the
unit
monthly.
B.
Inspection
and
Upkeep
A
ARNING:
Read
and
follow
safety
Informa
-
tion
at
beginning
of entire
Section
10-1
be
-
fore
proceeding.
Every
six
months,
inspect
the
gun,
hoses, and
cables.
If
dusty
or
dirty
conditions
are
present,
inspect
the
unit
monthly.
Inspection
should
consist
of
the
following:
1.
Unlatch and
open
left
case
access
door.
2.
Inspect
gun
for
broken
areas,
cracks,
and
loose
parts;
tighten,
repair,
and
replace
as
required.
3.
Repair
or
replace,
as
required,
all
hose
and
ca
-
ble;
give
particular
attention
to
frayed
and
cracked
insulation
and areas
where
hose
and
ca
-
bles
enter equipment.
4.
Remove
grease
and grime
from
components,
moisture
from
electrical
parts
and
cable.
A
CAUTION:
FLYING
DIRT
AND
METAL
PARTI
-
CLES
can
injure personnel
and
damage
equipment.
•
Point
gun
liner
only
in
a
safe direction away
from
personnel and
equipment
when
clean
-
ing
with
compressed
air.
5.
Blow out the
gun
wire
guide
liner
with
com
-
pressed
air
when
changing
wire.
This
will
remove
any metal
chips
and
dirt
that
may
have
accumu
-
lated.
6.
Close
and
secure
left
case
access
door.
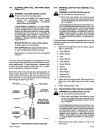
C.
Cleaning
Of
Drive
Rolls
A
WARNING:
Read
and
follow safety
informa
-
tion
at
beginning of
entire
Section
10-1
be
-
fore
proceeding.
MOVING
PARTS
can
cause
serious
injury.
•
Keep
away
from
moving
parts.
HIGH
ROTATIONAL
SPEED
may
cause
damage to
drive
rolls
and
injure
personnel.
•
Do
not
allow
drive
rolls
to
rotate
at
high
speed
if
compressed
air
is
used
for
cleaning
the
drive
roll
assembly
It
is
necessary
to remove
the
drive rolls
for
properclean
-
ing
of
the
wire
grooves
(see
Section
4-2
for
removal
and
installation
instructions).
Use
a
wire
brush to
clean
rolls.
IMPORTANT:
Failure
to
properly
maintain
the drive
rolls
can
result
in
a
buildup
of
wire
particles
which
decreases
the
efficiency
of
the wire
feeding
operation.
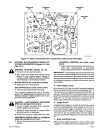
1.
Remove
the
three drive
roll
securing
screws
from
each
drive
roll,
and remove
drive
rolls.
2.
Using
wire
brush,
remove
the
buildup
of
wire
particles
in
the
wire
grooves.
3.
Reinstall
drive rolls according
to Section 4-2.
4.
Resume
operation.
S-21E
TM-1571
Page
25