


15
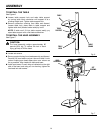
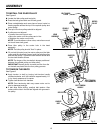
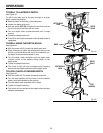
TO INSTALL THE IDLER PULLEY
See Figure 8.
n Locate the idler pulley and two belts.
n Press the belt guard latch and lift belt guard.
n Place a straightedge such as a piece of wood, metal, or
framing square across the top of the spindle pulley and
motor pulley.
n The top of the two pulleys should be aligned.
n If pulleys are not aligned:
• Loosen the motor mount nuts.
• Move the motor until the pulleys are in line.
• Retighten the motor mount nuts.
NOTE: To avoid rattles or other noise, motor frame must
not touch lower belt guard.
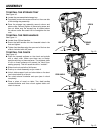
n Place idler pulley in the center hole in the head
assembly.
NOTE:
The idler pulley should "float" in place.
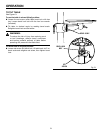
n Fit one belt (shorter) over the motor pulley and the idler
pulley and the other belt (longer) over the spindle pulley
and the idler pulley. Tighten the belt tension handle and
the two belt tension screws.
NOTE: The longer of the two belts is always positioned
between the spindle pulley and idler pulley.
IMPORTANT: Visually check to make sure the four ribs
on the belt are placed into the four pulley grooves.
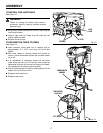
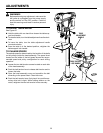
TO TENSION THE BELTS
See Figure 9.
n Apply tension to belt by turning belt tension handle
counterclockwise until belt deflects approximately 1/2
in. by thumb pressure at its center.
n Tighten belt tension lock handles.
NOTE: Over tensioning belt may cause motor not to
start or damage bearings.
n If belt slips while drilling, readjust belt tension. Also
make sure the ribs in the belt are aligned with grooves in
the pulley.
ASSEMBLY
Fig. 8
Fig. 9
IDLER
PULLEY
BELT GUARD
LATCH
HEAD
ASSEMBLY
SPINDLE
PULLEY
MOTOR
PULLEY
BELT TENSION
HANDLE
BELT TENSION
LOCK HANDLES
LONGER
BELT
SHORTER
BELT
1/2 IN.
DEFLECTION