


2
MDS-NT1
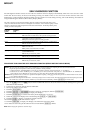
SELF-DIAGNOSIS FUNCTION
The self-diagnosis function consists of error codes for customers which are displayed automatically when errors occur, and error codes
which show the error history in the test mode during servicing. For details on how to view error codes for the customer, refer to the
following box in the instruction manual. For details on how to check error codes during servicing, refer to the following “Procedure for
using the Self-Diagnosis Function (Error History Display Mode)”.
PROCEDURE FOR USING THE SELF-DIAGNOSIS FUNCTION (ERROR HISTORY DISPLAY MODE)
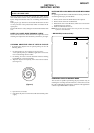
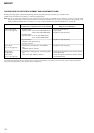
The deck’s self-diagnosis function automatically checks the condition of the MD deck when an error
occurs, then indicates the nature of the error through the two indicators. If the indicators light up or flash,
find them in the following table and perform the indicated countermeasure. Should the problem persist,
consult your nearest Sony dealer.
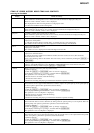
Playback
Indicator
(green)
Recording
Indicator
(red)
Cause/Remedy
Flashes The recording was not made properly. (C13/Rec Error)
, Set the deck in a stable surface, and repeat the recording procedure.
Flashes The inserted MD is dirty (with smudges, fingerprints, etc.), scratched, or
substandard in quality. (C13/Rec Error)
, Replace the disc and repeat the recording procedure.
Flashes The deck could not read the TOC on the MD properly. (C13/Read Error)
, Take out the MD and insert it again.
Lights up The deck could not read the TOC on the MD properly. (C14/Toc Error)
, Insert another disc.
, If possible, erase all the tracks on the MD.
Lights up Lights up There is an error in the internal data that the deck needs in order to operate.
(E0001/MEMORY NG)
, Consult your nearest Sony dealer.
Flashes Flashes There is a problem with the optical pickup. (E0101/LASER NG)
, Consult your nearest Sony dealer.
Both indicators flash alternately An MD loading problem has occurred. (E0201/LOADING NG)
, Consult your nearest Sony dealer.
B/> x/Z
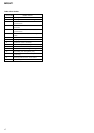
Note 1:The test mode and recording of this set are controlled by a personal computer, thus requiring the set to be connected to the PC.
Prepare the personal computer in which necessary software is already installed.
• Attached software “OpenMG Jukebox” (necessary for recording (check in, check out)) (Part No. : 4-237-880-01)
• Software for test mode “TestMode_S.exe” (“TestMode_S.exe” and essential files “data_files.csv”, “Net MDUSB.dil” are distributed to-
gether with the Service Manual. For the test mode, copy these three files in the same folder beforehand)
Note 2:In the operation in the test mode, the operational description requiring “click [xxx]” means that you have to click the button on the screen.
(“xxx” indicates the button name)
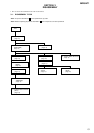
Note 3:Perform the self-diagnosis function in the “error history display mode” in the test mode. The following describes the least required procedure.
Be careful not to enter other modes by mistake. If you set other modes accidentally, click the [MENU/NO] to exit the mode.
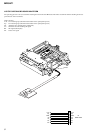
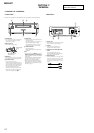
1. Press the [ ] button and [ ] button until the NetMD indicator turns off (for more than 3 seconds). (During this step, the USB
cable must be disconnected)
2. Connect the set to the PC with the attached USB cable.
3. Start up the software for test mode.
4. Click the [TEST MODE].
5. Click the [JOG UP] or [JOG DOWN] and when “[Service]” is displayed, click the [ENTER/YES].
6. Click the [JOG UP] or [JOG DOWN] to display “Err Display”.
7. Click the [ENTER/YES] to sets the error history mode and displays “op rec tm”.
8. Select the contents to be displayed or executed using the [JOG UP] or [JOG DOWN].
9. Click the [PUSH] to display or execute the contents selected.
10. Click the [PUSH] another time returns to step 8.
11. Click the [MENU/NO] to display “Err Display” and release the error history mode.
12. To release the test mode, quit the software for test mode after the [REPEAT] clicked.
Note: When retrying this operation, start from step1.