


20
MDS-NT1
Note 1:The test mode and recording of this set are controlled by a personal computer, thus requiring the set to be connected to the PC.
Prepare the personal computer in which necessary software is already installed.
• Attached software “OpenMG Jukebox” (necessary for recording (check in, check out)) (Part No. : 4-237-880-01)
• Software for test mode “TestMode_S.exe” (“TestMode_S.exe” and essential files “data_files.csv”, “Net MDUSB.dil” are distributed to-
gether with the Service Manual. For the test mode, copy these three files in the same folder beforehand)
Note 2:In the operation in the test mode, the operational description requiring “click [xxx]” means that you have to click the button on the screen.
(“xxx” indicates the button name)
Note 3:MD always plays double speed.
SECTION 4
TEST MODE
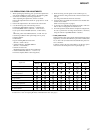
B/> x/Z
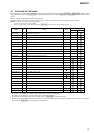
Function name Function
[JOG UP], [JOG DOWN] Select
[PUSH] Set Sub menu
[ENTER/YES] Proceeds onto the next step. Finalizes input
[MENU/NO] Returns to previous step. Stops operations
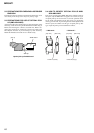
4-1. PRECAUTIONS FOR USE OF TEST MODE
• The software for test mode is used.
Be sure to start the software for test mode after quitting the application software.
• As loading related operations will be performed regardless of the test mode operations being performed, be sure to check that the disc
is stopped before setting and removing it.
Even if the [EJECT] is clicked while the disc is rotating during continuous playback, continuous recording, etc., the disc will not stop
rotating.
Therefore, it will be ejected while rotating.
Be sure to click the [EJECT] button after clicking the [MENU/NO] and the rotation of disc is stopped.
4-1-1. Recording laser emission mode
• Continuous recording mode (CREC MODE)
• Laser power check mode (LDPWR CHECK)
• Laser power adjustment mode (LDPWR ADJUST)
• Iop check (Iop compare)
• Iop value non-volatile writing (Iop NV save)
• Traverse (MO) check (EF MO CHECK)
• Traverse (MO) adjustment (EF MO ADJUST)
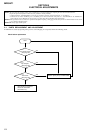
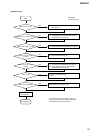
4-2. SETTING THE TEST MODE
1. Press the [ ] button and [ ] button until the NetMD indicator turns off (for more than 3 seconds). (During this step, the USB
cable must be disconnected)
2. Connect the set to the PC with the attached USB cable.
3. Start up the software for test mode.
4. Click the [TEST MODE].
5. When the test mode is set, “[Check]” will be displayed. Click the [JOG UP] or [JOG UP] switches between the following three
groups; ···Tt [Check] Tt [Service] Tt [Develop] Tt ···.
Note: Do not use the test mode in the [Develop] group.
If used, the unit may not operate normally.
If the [Develop] group is set accidentally, click the [MENU/NO] immediately to exit the [Develop] group.
4-3. RELEASING THE TEST MODE
Quit the software for test mode after [REPEAT] is clicked.
Note: When retrying test mode setting, perform the setting method from the start once again.
4-4. BASIC OPERATIONS OF THE TEST MODE
All operations are performed clicking the [JOG UP], [JOG DOWN], [PUSH], [ENTER/YES], and [MENU/NO].
The functions of these buttons are as follows.