


Chapter 6: Advanced Chassis Setup
6-3
6-3 System Fans
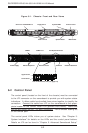
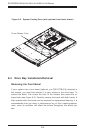
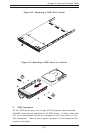
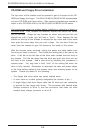
Two 10-cm blower fans provide all the cooling needed for the SuperServer
6014H-8/6014H-82/6014H-X8. It is very important that the chassis top cover
is properly installed and making a good seal in order for the cooling air to
circulate properly through the chassis and cool the components. See Fig-
ure 6-2.
The rpm of the blower fans can be adjusted with a setting in BIOS [see
page 7-17 - recommended setting is "3-pin (Server)"].
System Fan Failure
If a fan fails, the ambient air temperature in the chassis will rise and acti-
vate the Overheat/Fan Fail LED on the control panel. Replace any failed fan
immediately with the same type and model. You must power down the
system before replacing a cooling fan (removing the power cord is also
recommended as a safety precaution).
Replacing System Cooling Fans
1. Removing a fan
After first turning off the power to the system, remove the chassis cover
and unplug the fan cable from the motherboard. Unscrew the failed
blower fan from the chassis and pull it completely out from the
serverboard.
2. Installing a new fan
Replace the failed fan with an identical 10-cm, 12 volt fan (available from
Supermicro: p/n FAN-0059). Install the new fan in its proper place in the
chassis by positioning it on the two mounting posts. Secure the fan to
the chassis with the screws you removed previously, then attach the fan
wires to the same chassis fan header you removed it from. Make sure
the air seal under the fan is properly installed and creating a good seal.
Power up the system and check that the fan is working properly and that
the Overheat/Fan Fail LED on the control panel has turned off. Finish by
replacing the chassis cover.