


CC1800XL Concrete Saw Manual 19
CAUTION
• DO NOT leave the saw unattended until the
engine/motor is off and the blade has stopped
spinning.
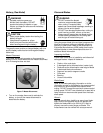
Gasoline Engine
1. Decrease the throttle to the slowest position for
several minutes.
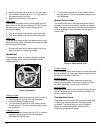
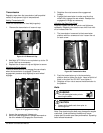
2. Hold down the stop button (on the control panel) to
stop the engine (applicable models). Note: This
action does not permanently stop the engine
3. Turn off the engine switch (applicable models).
.
Note:
Turning off the switch will stop the engine
permanently and will prevent the blade from
spinning unexpectedly
4. Turn the ignition key to
.
Off
5. Close the fuel shutoff valve (if desired).
and remove the key
(applicable models).
Electric Motor
1. Press the stop button on the starter box.
2. Disconnect the power cord from the saw and from
the outlet or generator.
Hydraulic Motor
1. Decrease the hydraulic flow on the hydraulic power
unit.
2. Push the ball valve on the saw up 90° to close the
valve and stop the motor.
3. Decrease the hydraulic flow to the minimum (or stop
position) on the hydraulic power unit.
4. Turn off the hydraulic power unit.
5. Disconnect the hydraulic power unit’s pressure hose
from the pressure line quick disconnect on the saw.
6. Disconnect the hydraulic power unit’s return hose
from the return line quick disconnect on the saw.
Concrete Cutting
WARNING
• DO NOT expose yourself or anyone
else to the direct line of the blade
when operating the saw.
• Turn off all electricity, gas, and water around
the direct work area prior to cutting.
• When using an electric motor saw, be aware of
all active electrical lines if using power from the
direct work area to operate the saw.
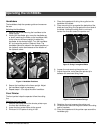
Helpful Hints Prior to Cutting
Keep the following things in mind for greater efficiency
when cutting:
• Use just enough handle pressure to guide the saw
on the cutting line. DO NOT forcibly direct (twist) the
saw from side-to-side when cutting.
• Avoid sawing excessively deep to preserve the
blade and reduce sawing costs.
• Moving too quickly when cutting may stall the saw or
may cause the blade to climb out from the cut. If the
saw stalls at any time, move the speed control lever
to Neutral (self-propelled model), raise the blade
from the cut, and restart the engine/motor.
• DO NOT lower the blade too quickly or move the
saw forward too quickly when finishing a partial-cut
to avoid forcing the blade into the concrete.
Tasks Prior to Cutting
Complete the following tasks prior to cutting:
• Raise the blade to provide proper clearance
between the blade and the ground when
maneuvering the saw.
• Align pointer assembly with the blade.
• Clearly mark the cutting line.
• Be sure the work area does not contain any buried
or embedded electrical, gas, or water lines.
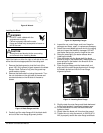
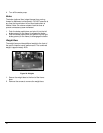
Making a Cut
1. Turn on the water valve. Note: Always use a proper
water pressure and flow when cutting
2. Turn on the water pump (as necessary).
.
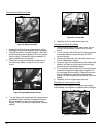
3. Align the blade and front pointer with the cutting line.
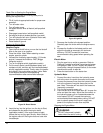
4. Lower the blade into the concrete slowly, in two-inch
increments, to reach the desired cutting depth. DO
NOT cut any deeper than required.
5. Use the speed control lever (self-propelled model) or
push (push model) the saw forward, at a proper
speed, to continue down the cutting line. Cut as fast
as the blade allows; if the blade climbs out of the cut
reduce the forward speed and/or cutting depth.
Raise and lower the blade as necessary while
cutting.
Continuing a Partial-Cut
1. Align the blade with the previous cut and lower the
blade back into the cut. DO NOT move forward
unless the blade is properly aligned within the cut.
2. Use the speed control lever (self-propelled model) or
push (push model) the saw forward, at a proper
speed, to continue down the cutting line. Raise and
lower the blade as necessary while cutting.
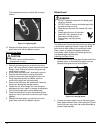
Finishing a Cut
1. Place the speed control lever at Neutral
2. Raise the blade from the cut (high enough for proper
ground clearance).
(self-
propelled model), or stop the saw (push model).
3. Turn off the water valve.