


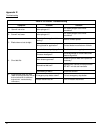

26
Tensioning the Blade Drive Belts
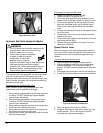
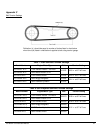
Figure 34: Blade Drive Belts
1. Inspect the belts for fraying, stress cracks, and/or
breakage and replace immediately when damaged.
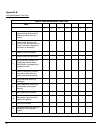
2. Test the belt tension. Proceed to step 3 if the belts
need tensioning (refer to Appendix C for the proper
tension setting). Operate the saw as needed if no
tension adjustments are required.
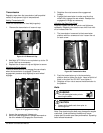
3. There are four engine/motor base screws; two on
the side of both bases. Loosen the nut on each
screw.
Figure 35: Engine/Motor Base Screws
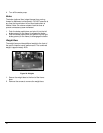
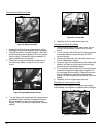
4. Turn the tension bolt at the front of the engine/motor
clockwise to tighten the belts. Readjust the tension
bolt as necessary to reach the required tension
setting. DO NOT exceed the manufacturer’s tension
setting.
Figure 36: Tension Bolt
5. Retighten all four engine/motor base nuts.
Replacing the Blade Drive Belts
1. There are four engine/motor base screws; two on
the side of both bases. Loosen the nut on each
screw.
2. Turn the tension bolt at the front of the engine/motor
counterclockwise to loosen the belts. DO NOT
remove the bolt.
3. Remove the belts from the crankshaft sheave and
from the blade shaft sheave.
4. Loop and align the new belts around the blade shaft
sheave, and then pull them up and loop and align
them around the crankshaft sheave.
5. Turn the tension bolt at the front of the engine/motor
clockwise to tighten the belts (refer to Appendix C
for the proper tension setting). Readjust the tension
bolt as necessary to reach the required tension
setting. DO NOT exceed the manufacturer’s tension
setting.
6. Retighten all four engine/motor base nuts.
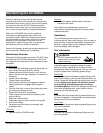
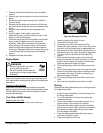
Replacing the Transmission V-Belt
Inspect the V-belt regularly for fraying, stress cracks,
and breakage, and replace immediately when damaged.
Figure 37: Transmission V-Belt