


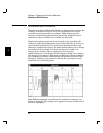
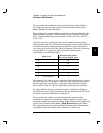


X and Y Markers
Vertical (X) or horizontal (Y) markers are available in HP BenchLink/Arb
to assist you in creating and modifying waveforms. Select
Edit | X Markers or Edit | Y Markers or click their icons to display
the X or Y markers. When the markers are first displayed, your cursor
will be in the ‘marker’ mode. The markers can be moved by clicking the
mouse on any of the markers and dragging them to the desired location
or by using the left and right arrow keys. The X or Y marker positions
and the difference between the X or Y marker position is displayed in the
Status Bar at the bottom of your HP BenchLink/Arb screen. Markers can
be disabled by selecting the appropriate commands from the Edit Menu
or by clicking their icons on the Palette Bar.
Markers can be set and held in a specific position by clicking the
Thumbtack icon or by selecting Edit | Set Thumbtack from the Menu
Bar. Thumbtacked markers can be used to confine the editing area or to
alter a standard waveshape segment using freehand or line drawing
mode. Drawing is permitted only in the area between the markers and
must be started in the marked area. Clicking and drawing outside of this
area is ignored.
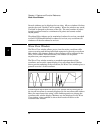
Grid
The waveform edit window contains horizontal and vertical gridlines.
To change the spacing of the horizontal and vertical grid lines select
View | Grid... from the Menu Bar.
The spacing of the vertical (up/down) grid lines is directly affected by the
View | Grid... command. the horizontal spacing (left/right) of the grid
lines is automatically adjusted to standard values (such as 0, 0.25, 0.5,
0.75, or 1.0).
Grid line spacing is specified in terms of the number of of screen display
pixels between grid lines. While this spacing also relates to the number of
waveform data points displayed between grid lines, the relationship is
not always one-to-one due to the effects of zooming. Six levels of zooming
are provided (0 - 5). Refer to the discussion on page 53 for more
information about the grid settings.
4
Chapter 4 Feature and Function Reference
X and Y Markers
57