


Return to Section TOC Return to Section TOC Return to Section TOC Return to Section TOC
Return to Master TOC Return to Master TOC Return to Master TOC Return to Master TOC
A-4
INSTALLATION
LN-8
A-4
LN-8S AND LN-8SE (AND CONVERTED
LN-8N AND LN-8NE)
1. Use either a constant voltage or constant current
type power source as required for the application.
Ensure the power source is properly set for
constant voltage or constant current welding, as
appropriate, per the instructions in the power
source operating manual.
2. Set the LN-8 wire feeder for a constant voltage or
constant current power source as appropriate per
the following:
a. There are two nameplates on the front of the
wire feeder, one mounted on top of the other.
Be sure the ‘Constant Current Power Source’
nameplate is on top when using a constant
current power source. When connected to a
constant voltage power source, be sure the
‘Constant Voltage Power Source’ nameplate is
on top.
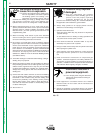
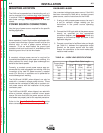
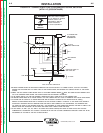
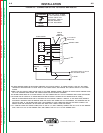
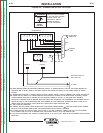
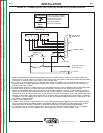
b. Turn the power to the wire feeder off. Open the
door to the control section and switch the
power source selection switch to constant
current ‘CC’ or constant voltage ‘CV’ as
appropriate. See Figure A.1.
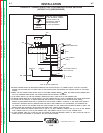
3. Connect the LN-8 input cable to the power source
exactly as specified in the wire connection
diagrams in Table A.2. Include any jumpers on
the terminal strips as shown in the connection
diagrams.
4. Connect a work lead of sufficient size and length,
per Table A.1, between the appropriate output
terminal on the power source and the work.
Ensure the connection to the work makes tight
metal-to-metal contact.
FIGURE A.1 – POWER SOURCE SELECTION
SWITCH
POWER SOURCE
SELECTION SWITCH
VARIABLE
VOLTAGE
PC BOARD
VARIABLE
VOLTAGE
PC BOARD