


TROUBLESHOOTING & REPAIR
F-55 F-55
POWER MIG 350MP
Return to Section TOC Return to Section TOC Return to Section TOC Return to Section TOC
Return to Master TOC Return to Master TOC Return to Master TOC Return to Master TOC
FAN MOTOR ASSEMBLY REMOVAL AND REPLACEMENT
(continued)
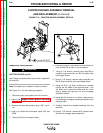
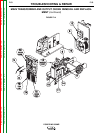
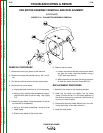
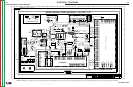
FIGURE F.15 – FAN MOTOR ASSEMBLY REMOVAL
6
4B
4A
6
5
REMOVAL PROCEDURE
1. Disconnect main input power to the machine.
2. Remove the case side panels using a 3/8” nut dri-
ver.
3. Cut the wire tie from around the fan motor leads.
4. Disconnect fan motor leads:
a. Unplug the black lead from its in-line connector.
b. Using a slot or phillips head screwdriver, discon-
nect the white lead at the fan relay. See Figure
F.15.
5. Remove the fan blade. Note the position of the fan
on the shaft for reassembly.
a. Using a slot head screwdriver, loosen the fan
blade clamp.
b. Slide the fan blade off the motor shaft.
6. Remove the fan motor.
a. Loosen and remove the two nuts and lock wash-
ers from the motor mounting bracket using a
11/32” open end wrench.
b. When the motor is free from the mounting brack-
et, slide the motor from the Power MIG unit.
REPLACEMENT PROCEDURE
1. Attach the fan motor to the mounting bracket.
2. Install the fan blade and tighten the fan blade
clamp. Ensure the fan is in the same position on
the shaft as it was prior to removal. Spin the fan to
be sure it is free to rotate.
3. Connect the fan motor leads: black at its in-line con-
nector and white at fan relay terminal 1.
4. Install the case sides.