


7
Unpacking
Open shipping container and check for shipping
damage. Report any damage immediately to
your distributor and shipping agent. Do not
discard any shipping material until the
Planer/Molder is assembled and running
properly.
Compare the contents of your container with the
following parts list to make sure all parts are
intact. Missing parts, if any, should be reported
to your distributor. Read the instruction manual
thoroughly for assembly, maintenance and
safety instructions.
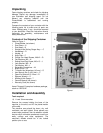
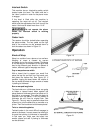
Contents of the Shipping Container
Refer to Figure 1.
1 Planer/Molder (not shown)
1 Dust Chute – A
1 Dust Hood – B
1 Straight Knife Setting Gauge Assy. – C
1 Handwheel – D
1 Handle – E
3 Knife Gibs – F
8 Phillips Pan Head Screws, M6x12 – G
8 Flat Washers, M6 – H
1 Socket Head Cap Screw, M6 x 15 - J
1 Lock Washer, M6 – K
1 Flat Washer, M6 – L
1 Reversible Screwdriver – M
1 Brass Punch – N
2 T-Handle Hex Wrenches (4,6 mm) – O
1 Hex Wrench Set (3,4,5,6 mm) – P
1 Open-End Wrench 10-12mm – R
1 Spanner Wrench – S
1 Molding Knife Gauge – T
1 Owner's Manual (not shown)
1 Warranty Card (not shown)
Items E through S comprise hardware package,
stock no. PM15-HP.
Installation and Assembly
Tools required:
10, 11 and 13mm wrenches
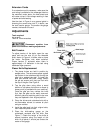
Remove the screws holding the base of the
machine to the skid, and lift the planer/molder
off the skid.
The machine area should be clean, dry, well
ventilated, and well lighted. Since planers can
create noise problems, the site selection should
be one which minimizes reverberant sound from
walls, ceilings and other equipment. The
machine’s wheels should be in the locked
position prior to use.
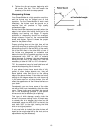
Figure 1