


-36-
For Machines Mfg. Since 3/11
16-Speed Gearhead Lathe
OPERATION
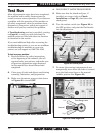
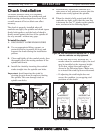
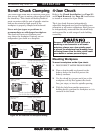
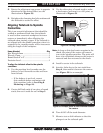
Figure 40. Registration mark locations.
Camlock
Spindle
2-Piece
Direct Mount
Camlock Chuck
Marks
for Chuck
Reassembly
Chuck
Halves
Spindle & Chuck
Registration Marks
Registration Marks
Lightly stamp registration marks across the
mating seams of chuck components
.
These marks
will help you re-install the chuck in the same
position after removal, which ensures consistent
chuck balance and turning results, and allows
the same camlocks and studs to operate together
for consistent locking and unlocking.
To remove the chuck:
1.
DISCONNECT LATHE FROM POWER!
2.
Use an appropriate lifting, support, or
protective device to protect the ways and
support the chuck.
3.
Loosen the camlocks by turning the key
counterclockwise until the cam lines are
aligned with the mark on the spindle nose.
Tip:
Camlocks can become very tight. A cheater
pipe may be used as a last resort to add
leverage when loosening. After loosening,
you may need to wiggle the chuck key in the
camlock to fully disengage the stud.
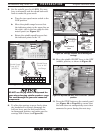
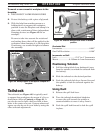
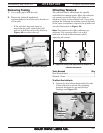
Figure 41. Camlock is fully loosened when the cam
line is aligned with the spindle mark.
Cam line aligned with spindle mark
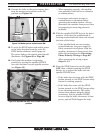
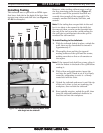
4. Using a dead blow hammer or other
soft mallet, lightly tap around the outer
circumference of the chuck body to loosen it
from the spindle.
5.
Remove the chuck from the spindle, using
a light rocking motion to carefully slide the
studs out of the bores.
— If the chuck does not immediately come
off, rotate it approximately 60˚ and tap
it again. Make sure all the marks on the
cams and spindle are in proper alignment
for removal.
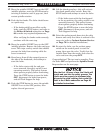
Chuck Removal
7. Verify that the chuck fits the spindle
properly by checking for any gaps between
the mating surfaces.
— If there are no gaps, proceed to Step 8.
— If there is a gap, remove the chuck, re-
clean the mating surfaces carefully, and
re-install. If the problem persists, refer to
Troubleshooting.
8. Verify that the chuck/spindle tapers
are seated firmly together by removing
the chuck, per the Chuck Removal
instructions, and pay close attention to how
easily the tapers release.
— If it was necessary to bump the chuck or
use a mallet to release the tapers, then
they are seating together properly.
— If the tapers released easily with little
intervention, they are not seated together
firmly as required. Remove the chuck, re-
clean the mating surfaces carefully, and
re-install. If the problem persists, refer to
Troubleshooting.