Maintenance
THS710A, THS720A, THS730A & THS720P Service Manual
6–23
You will need a
1
@
8
inch flat-bladed screwdriver and needle-nose pliers to remove
modules mounted to the the chassis.
Removal. First, remove the front cover and switch mat using the procedure on
page 6–11. Next, remove the chassis assembly using the procedure on page
6–19. Then, use the following procedure to disassemble the chassis.
STOP. If you are disassembling only for cleaning, inspect the chassis assembly to
determine whether further disassembly is required to perform internal cleaning.
If so, then proceed.
1. Remove the display module and inverter board using the procedure on
page 6–16.
2. With the switch flex-circuit assembly folded toward you, place the chassis
assembly on a soft, static-free surface with the main board side facing up.
3. To remove the main board and switch flex-circuit assembly from the chassis,
follow these steps:
a. Use the needle-nose pliers to remove both coaxial connectors from the
back side of the BNC connectors. Be careful not to crush the cable.
b. Use the
1
@
8
inch flat-bladed screwdriver to open the display cable
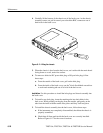
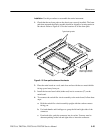
connector on the main board and then disconnect the display cable. Refer
to Figure 6–9 on page 6–18 if necessary.
c. Dress the battery cable outward to free it from obstructions.
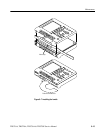
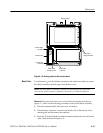
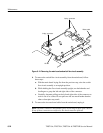
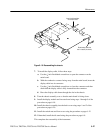
d. Following the sequence (circled numbers) shown in Figure 6–14, lift
gently on the edges of the main board while releasing the board-retaining
snaps.
CAUTION. To prevent damage to the flex circuit, take care not to twist the flex
circuit at its connection to the main board.
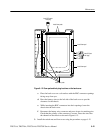
e. When all six snaps are released, lift the main board and switch flex-cir-
cuit assembly out of the chassis enough to access the back side of the
banana jacks.
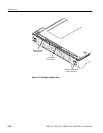
f. Use the needle-nose pliers to remove both wires from the back side of
the banana jacks. Be careful not to deform the connectors attached to the
wires.
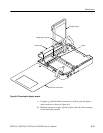
g. Complete the removal of the main board and switch flex-circuit
assembly and then place it on a soft, static-free surface with the two
metal shields facing up.
Complete Disassembly


